Payments company PayPal’s threat to expand its speech restrictions (which it later claimed was an “error” after facing mass pushback) and its growing levels of censorship have led to many people deciding to cut ties with the company and delete their PayPal accounts.
Follow these steps to delete your PayPal account.
Preparing to delete your PayPal account
Before you delete your PayPal account, you’ll need to make sure you’ve withdrawn your money, canceled or redirected any pending payments, and downloaded a copy of all the records you need.
1. Withdraw your funds
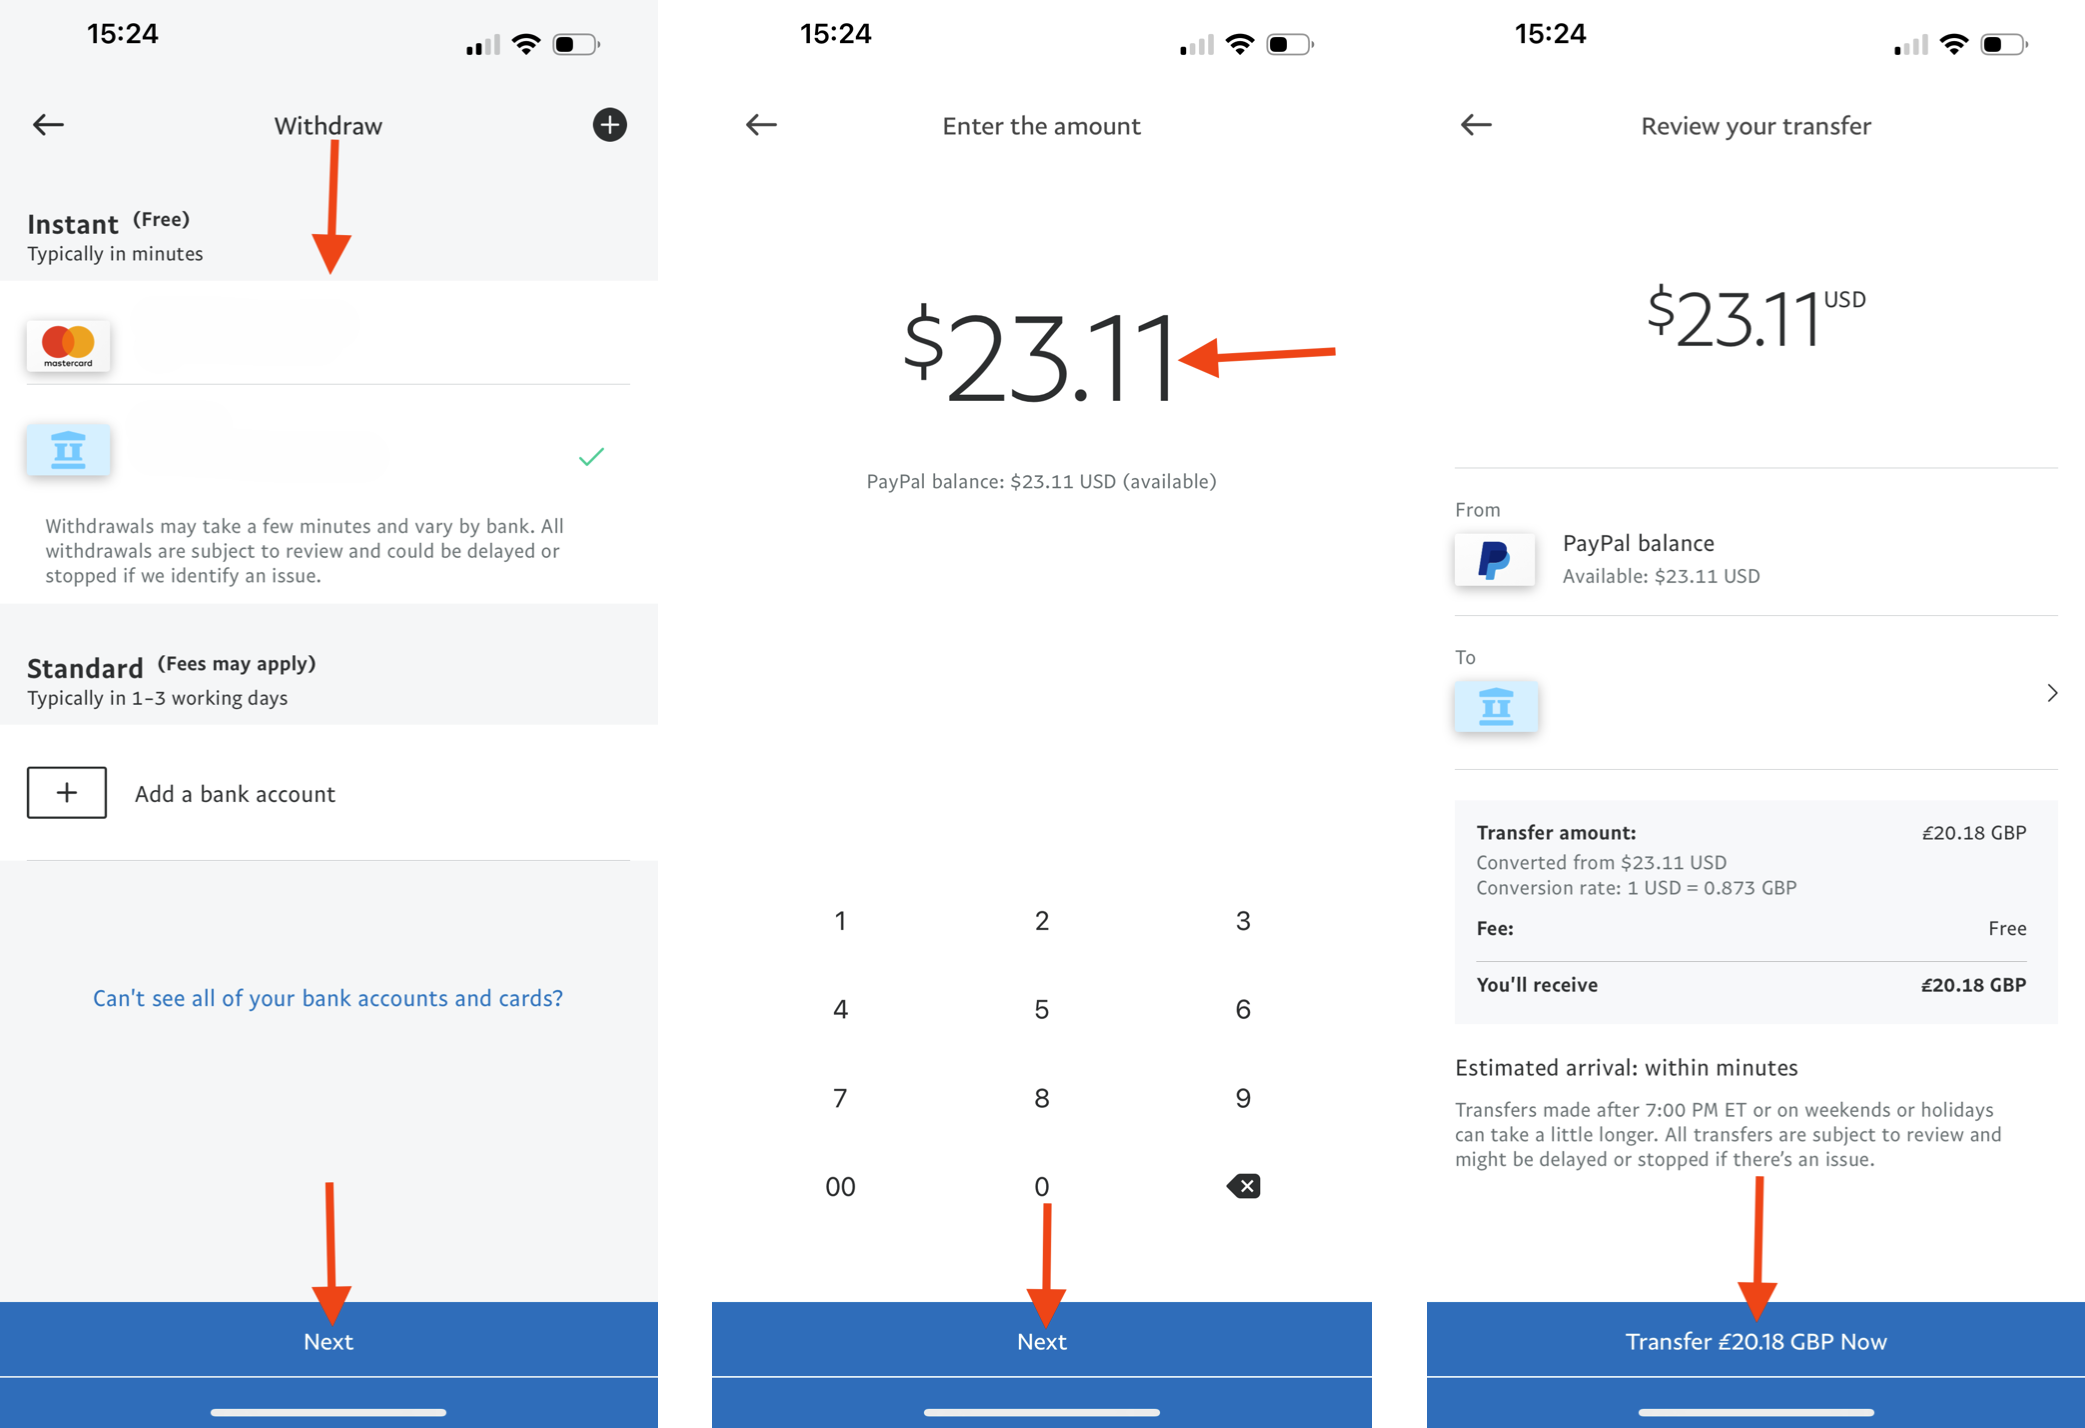
PayPal offers both “Instant” withdrawals (which usually complete within minutes) and “Standard” withdrawals (which can take up to three business days). It may also apply fees to some withdrawal methods. You can avoid fees and get the fastest withdrawal by choosing a withdrawal option that’s listed as “Instant (free).”
To withdraw from your PayPal account:
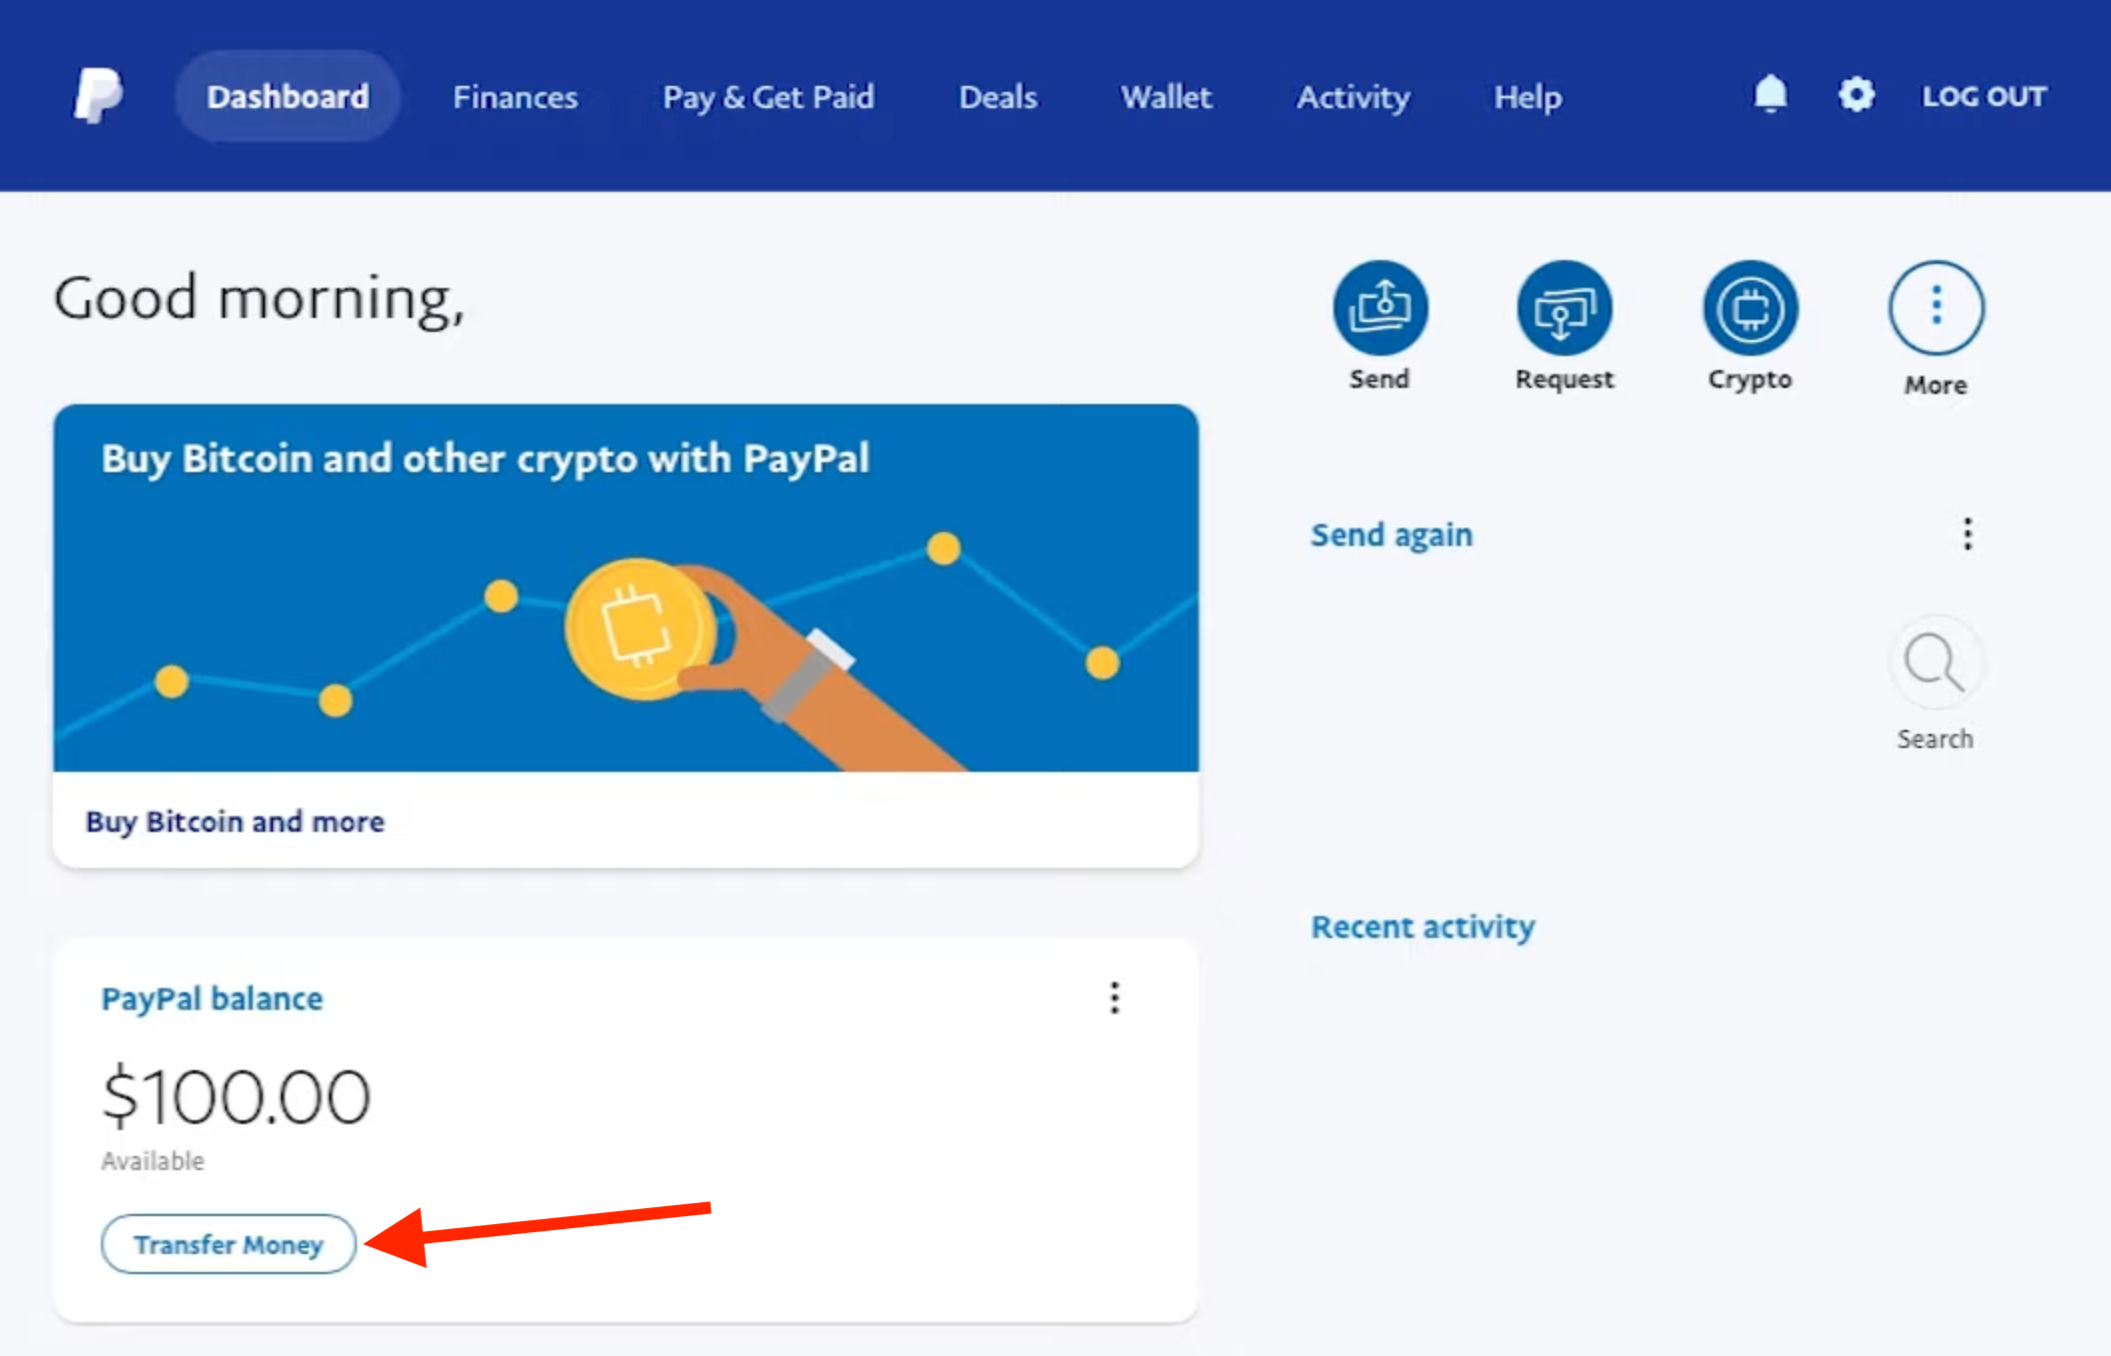
1a. If you’re using the PayPal website, click or tap “Transfer money.”
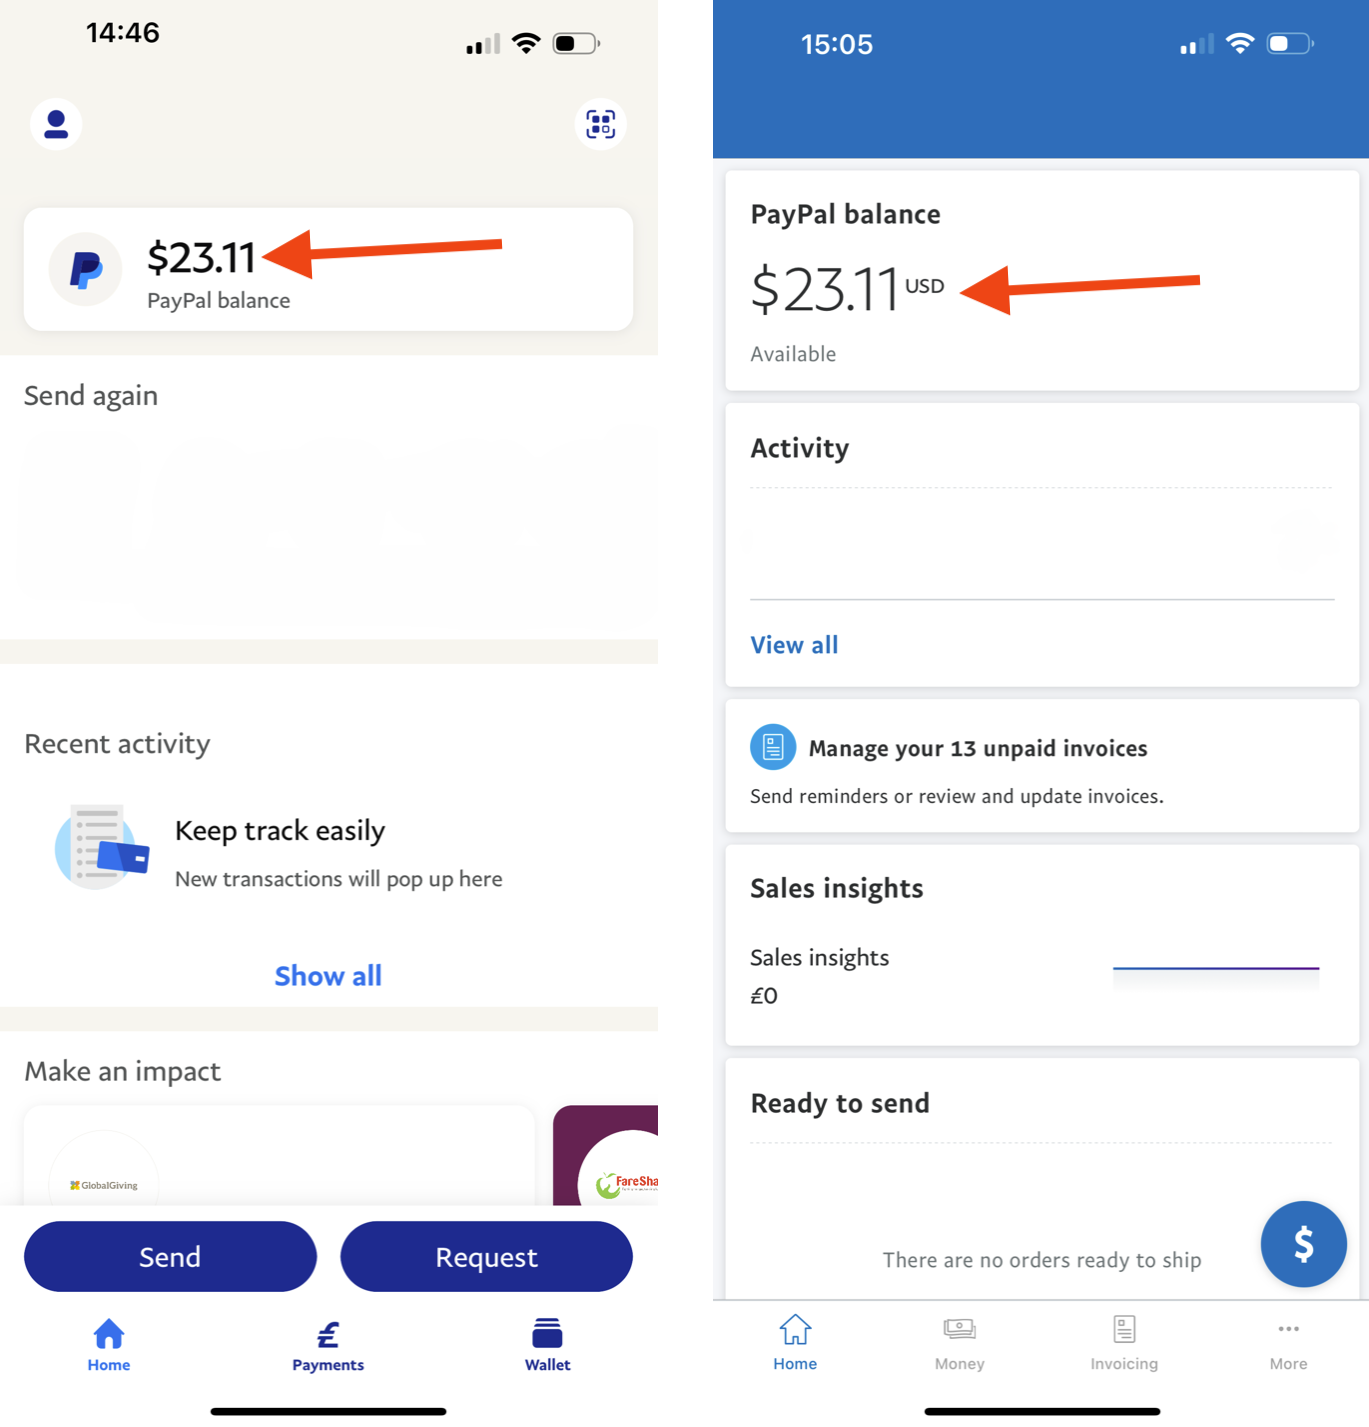
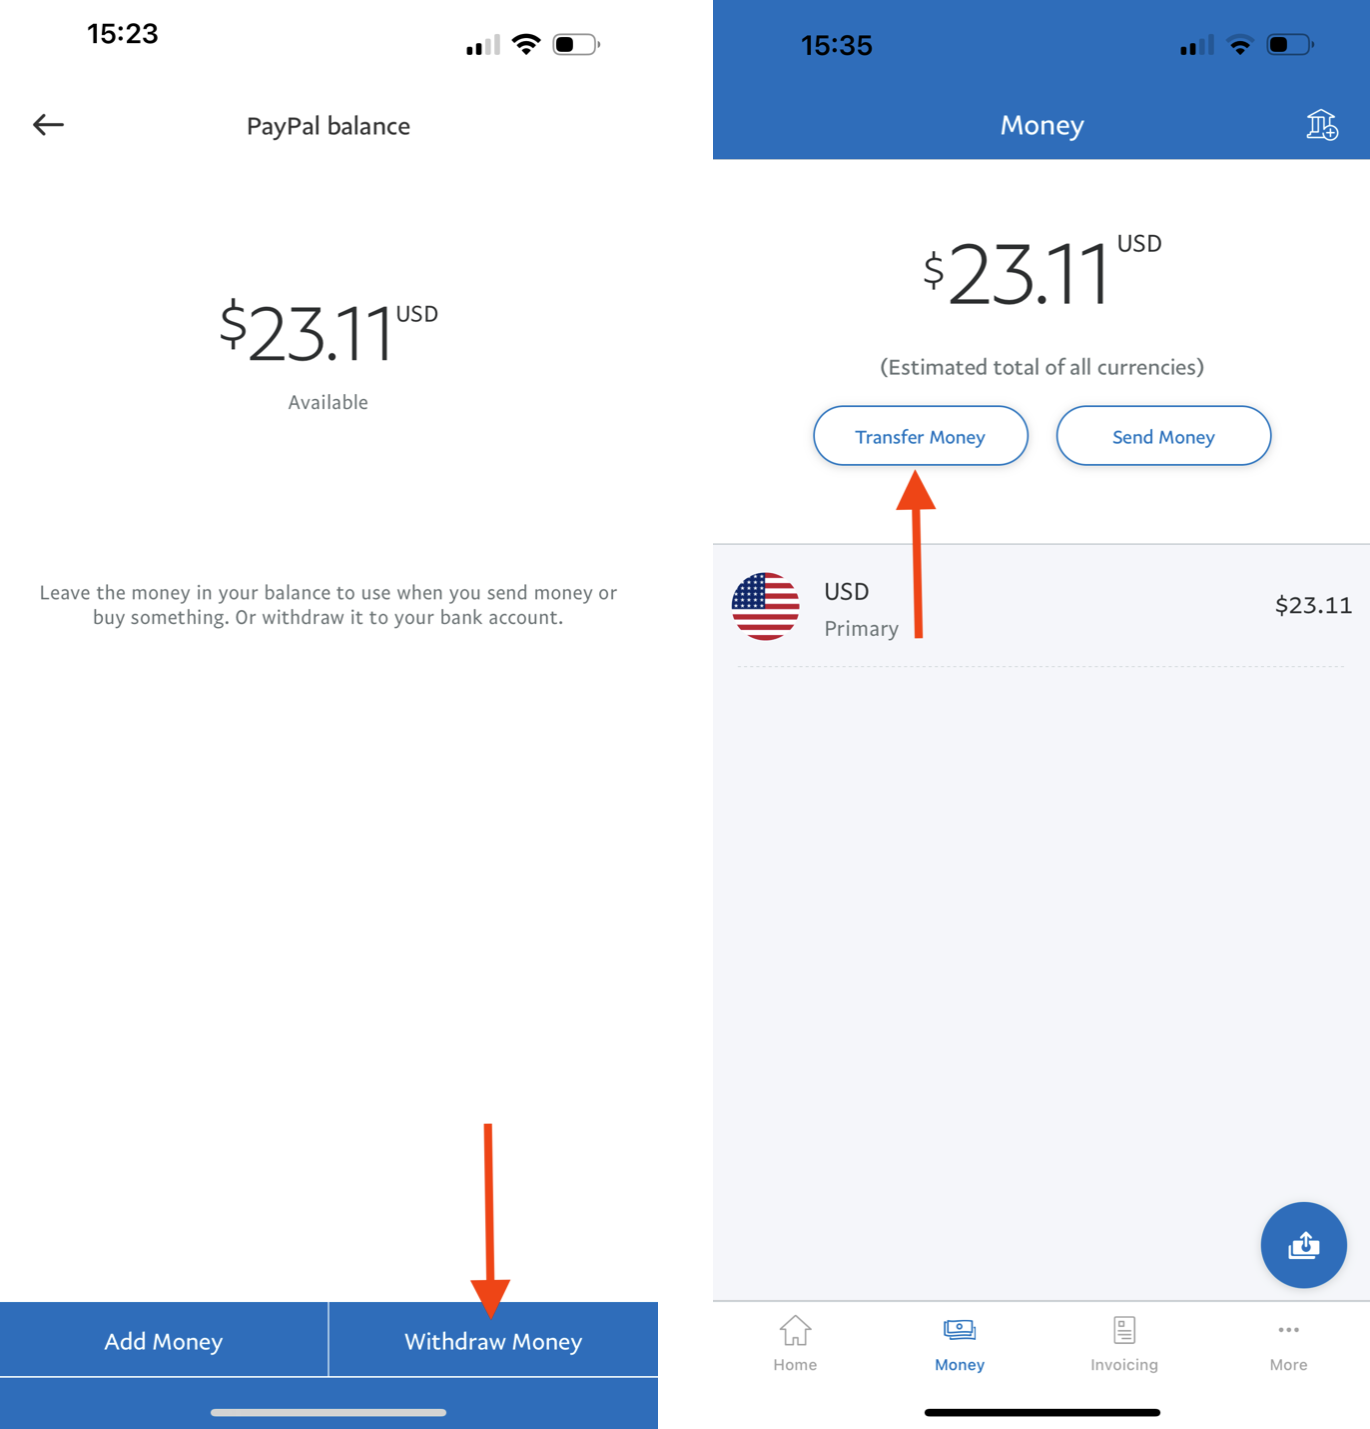
1b. If you’re using the PayPal app or the PayPal Business app, tap on your balance and select “Transfer Money or “Withdraw Money.”
2. Select the bank account or card to which you want to withdraw.
3. Enter your entire available PayPal balance as the amount you want to withdraw.
4. Confirm the withdrawal by clicking or tapping “Transfer [amount] Now” or “Transfer Now.”
2. Cancel or redirect any pending payments
If you currently have pending payments going to or from your PayPal account, you’ll need to cancel or redirect these payments.
The exact process will depend on how you currently use your PayPal account but it will generally involve reviewing all of the incoming and outgoing payments, deciding which payments to cancel, and deciding which payments to redirect.
Some of the incoming payments you may want to review include individual payments (such as one-time payments from your contacts) and recurring payments (such as affiliate commissions or subscription payments for any products or services that you sell).
Some of the outgoing payments you may want to review include individual payments (such as payments to your contacts or one-time payments for products or services) and recurring payments (such as subscriptions to streaming services).
Reviewing your recurring payments
You can review some of your recurring payments on PayPal’s pre-approved payments pages on the PayPal website and in the PayPal app.
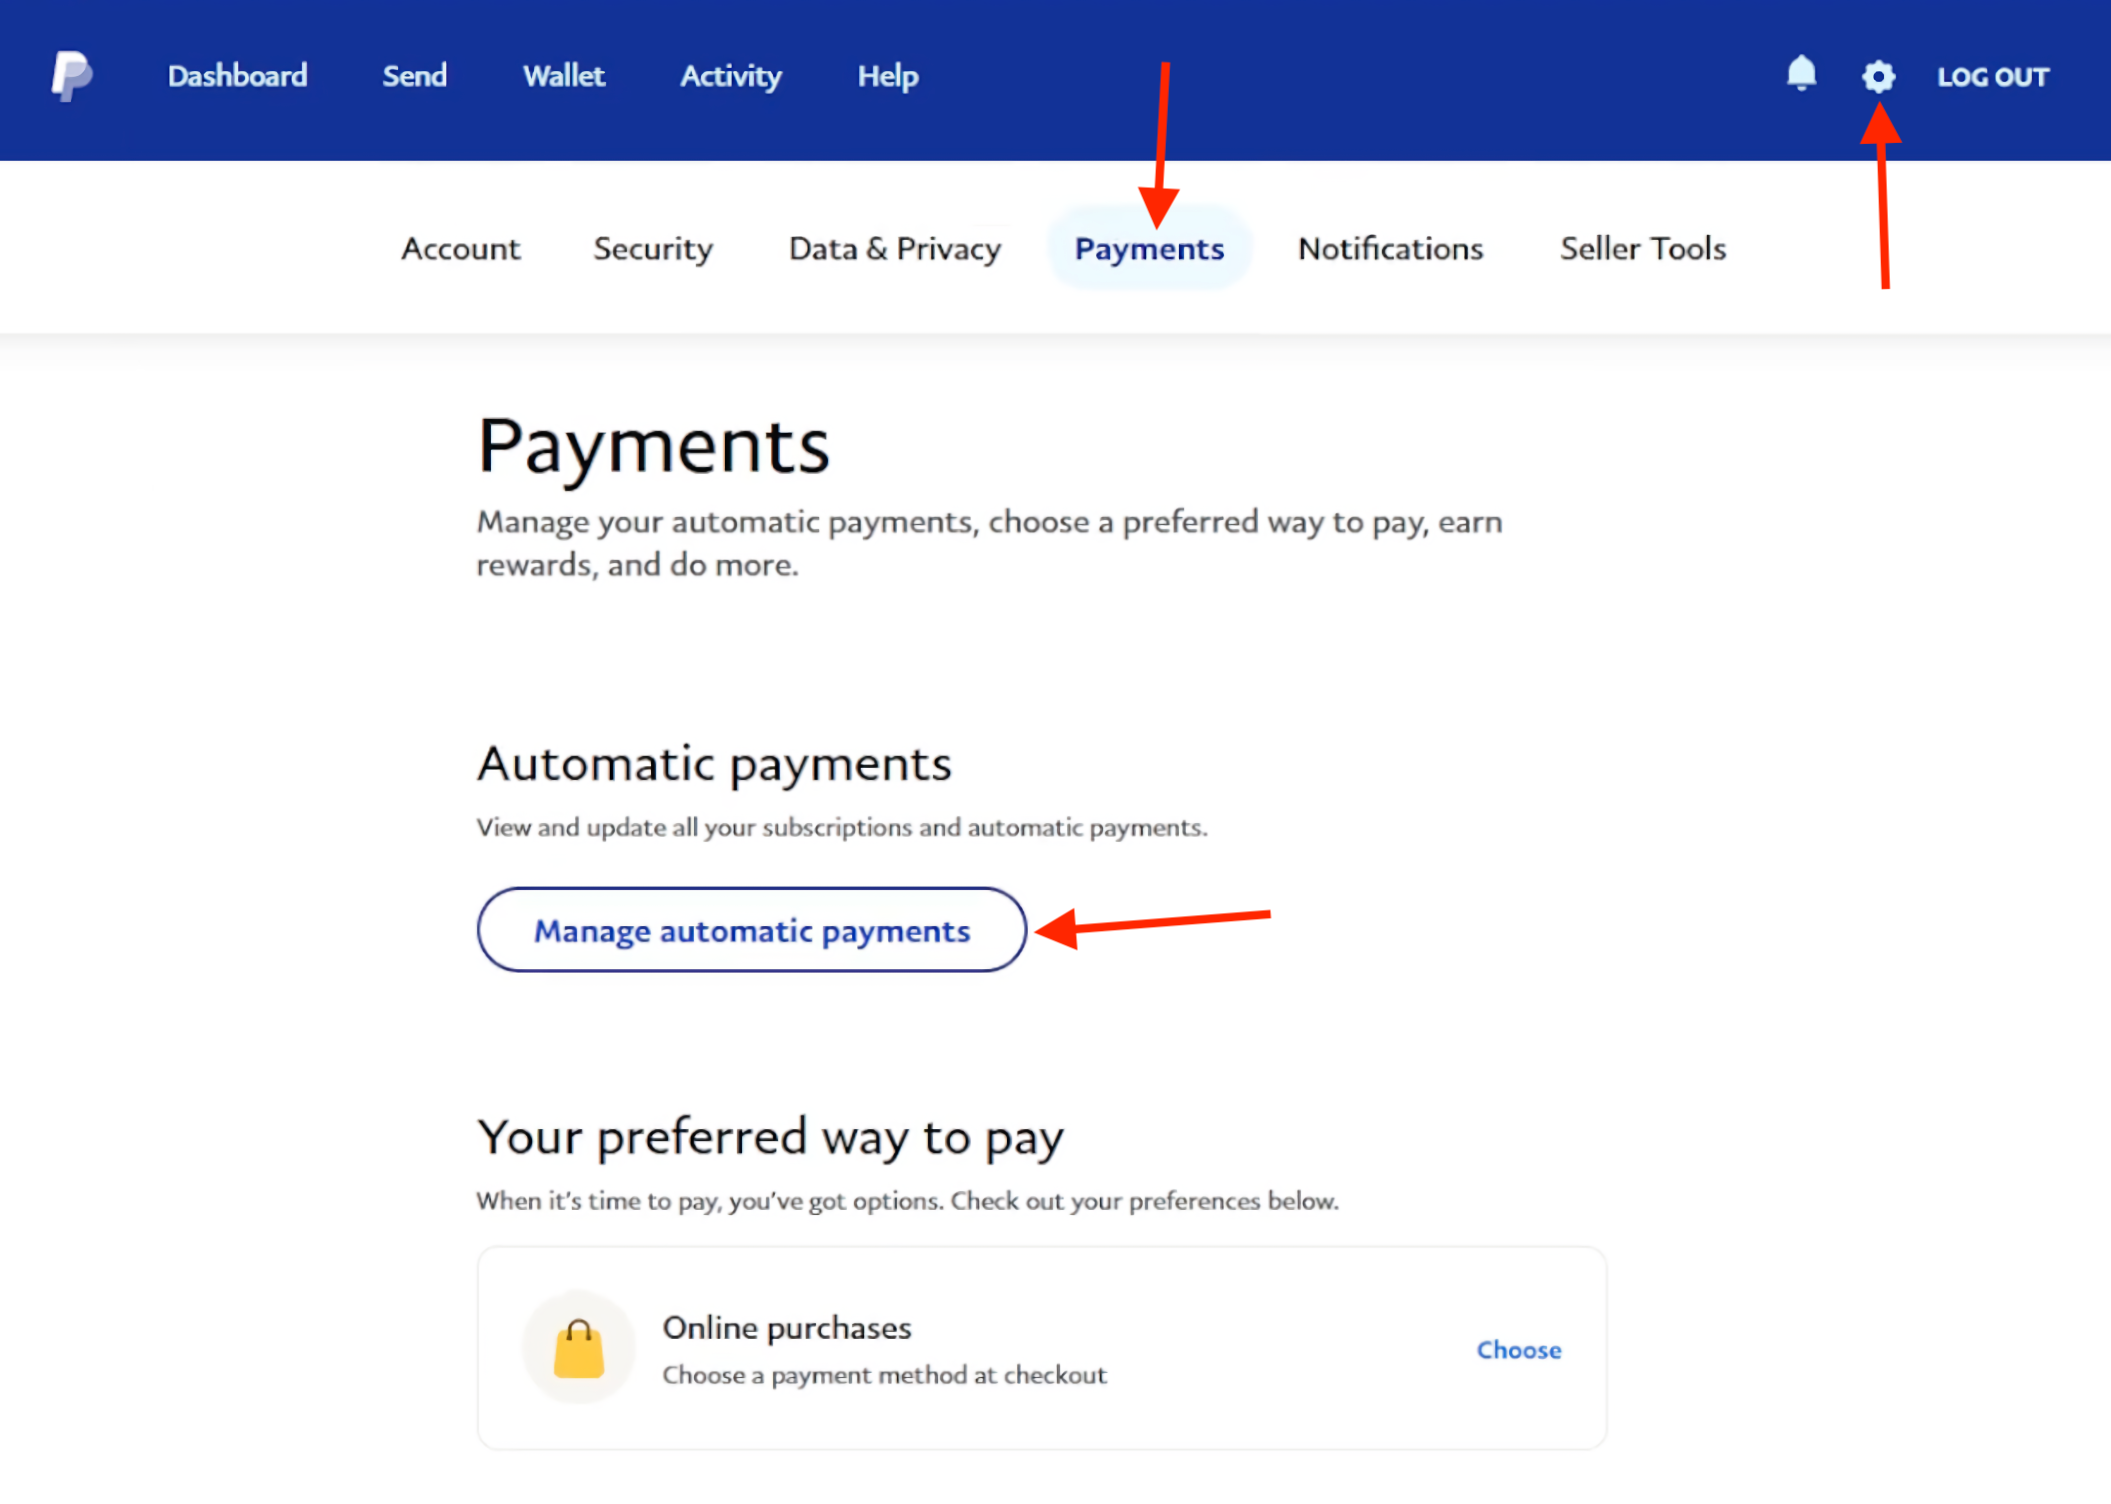
To review pre-approved payments for a personal PayPal account on the PayPal website, click or tap the settings cog and select “Payments” > “Manage automatic payments.”
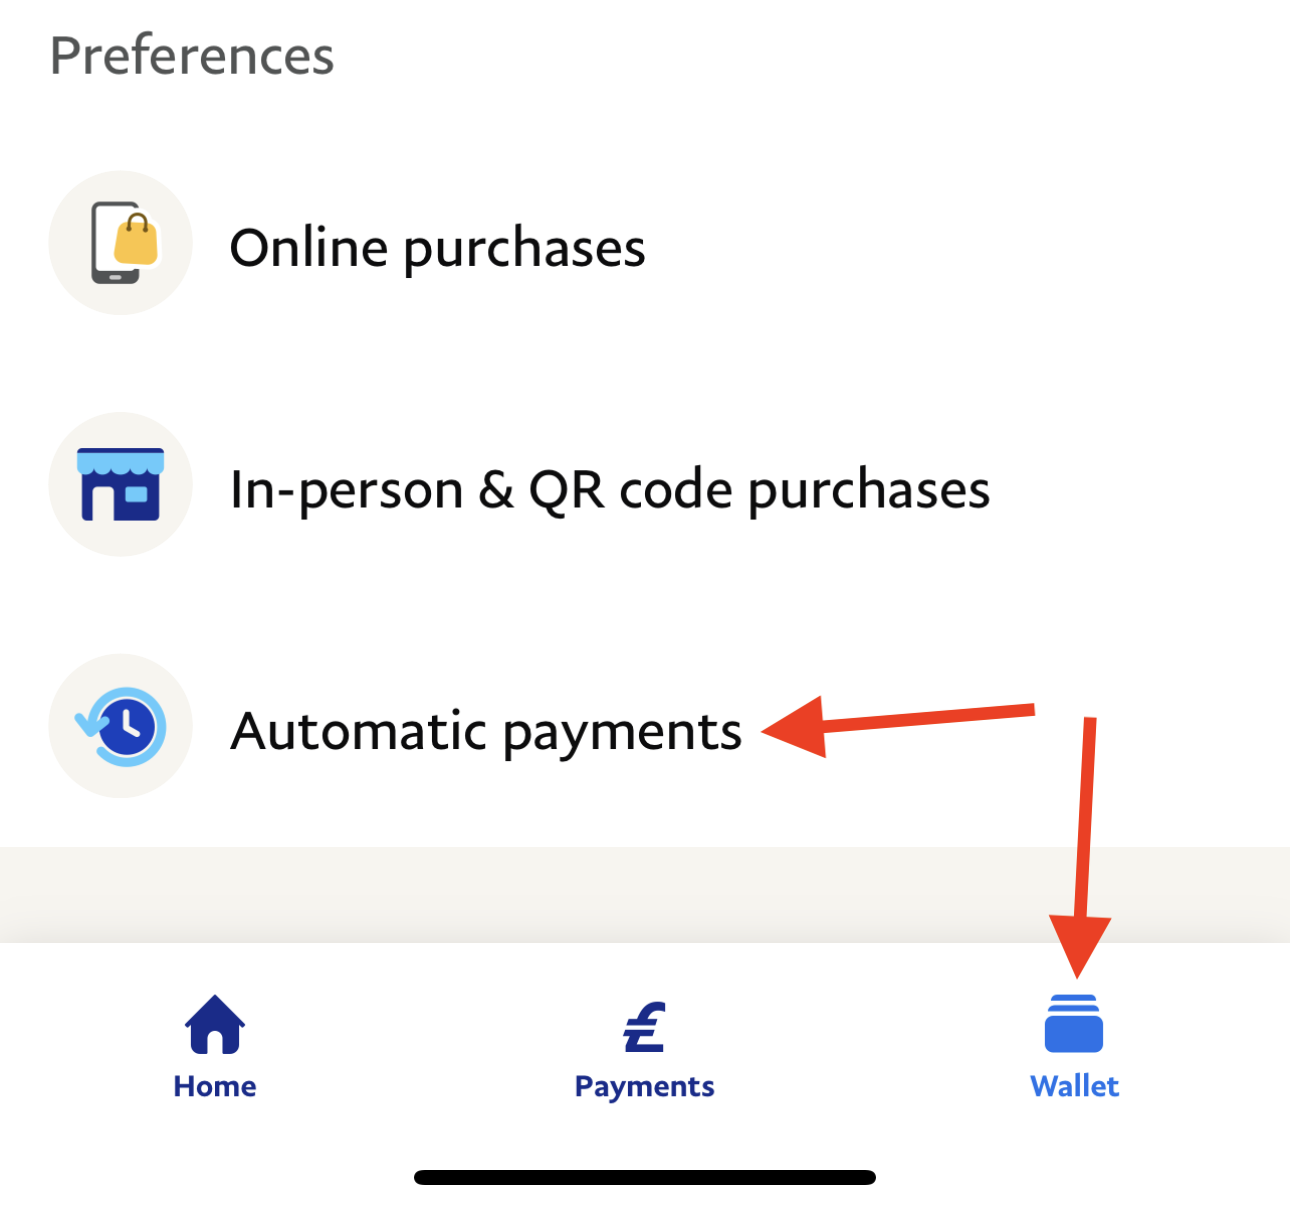
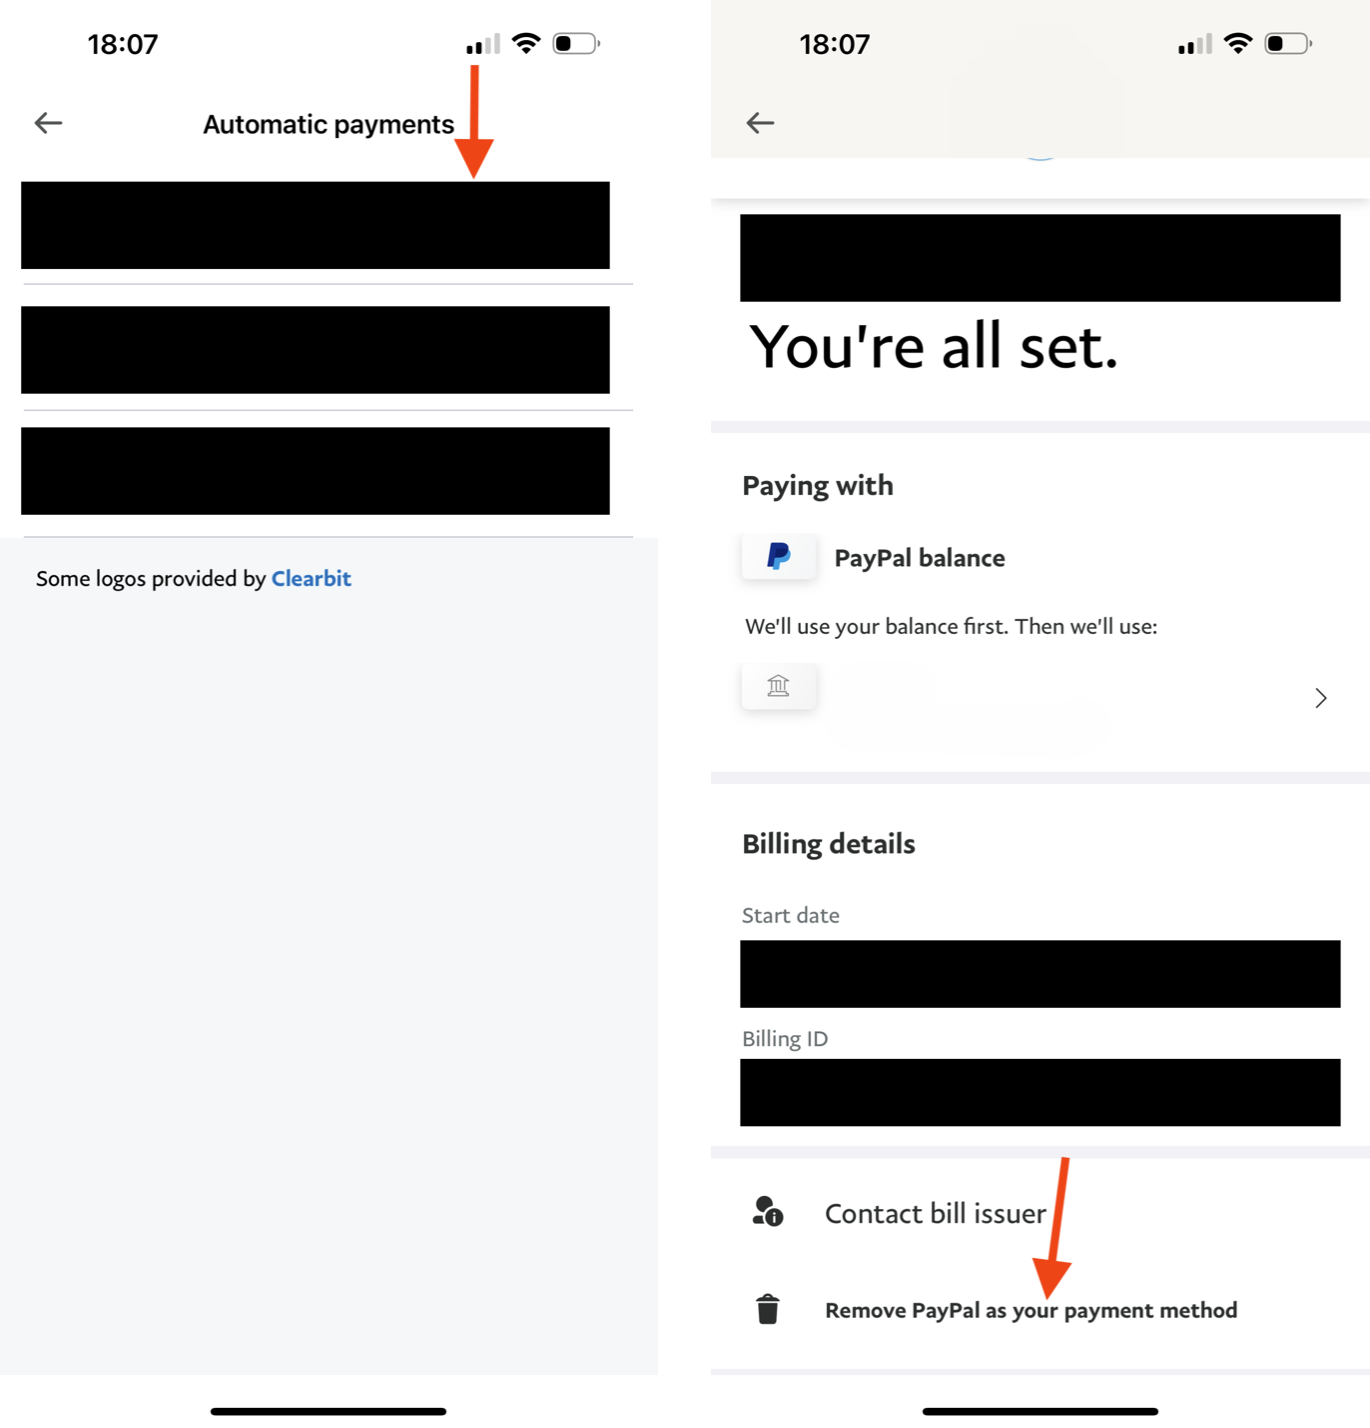
To review pre-approved payments for a personal PayPal account in the PayPal app, tap “Wallet” > “Automatic payments.”
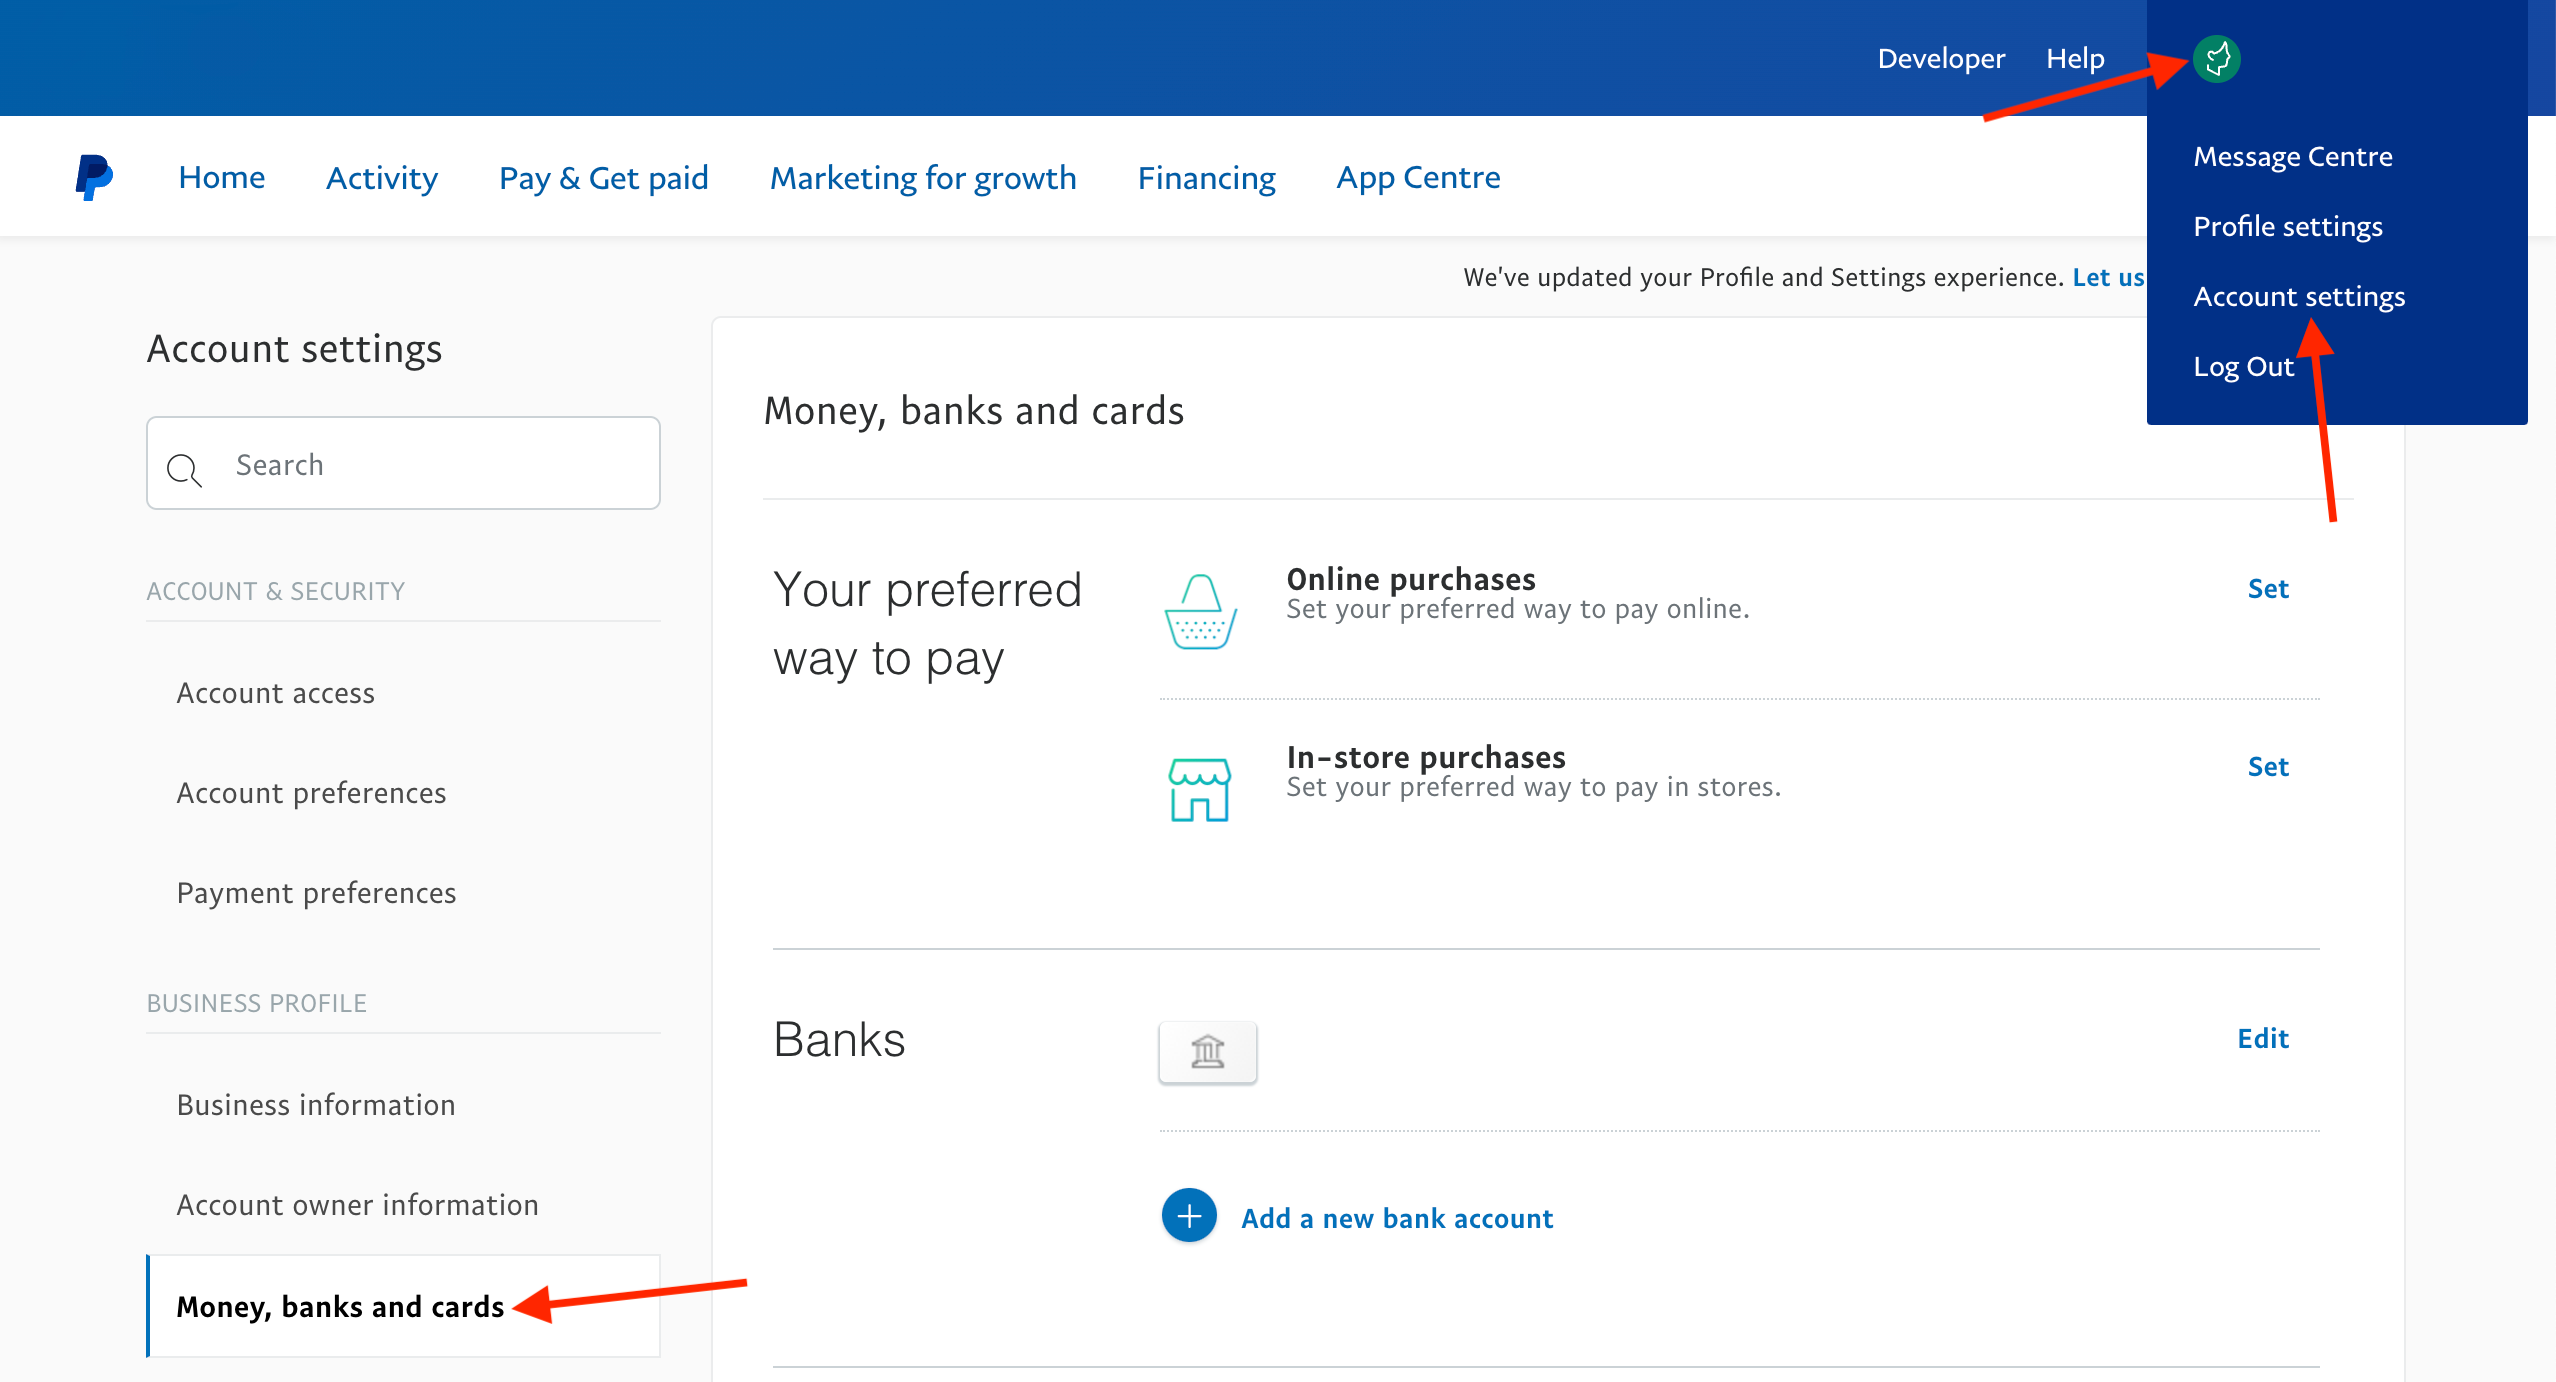
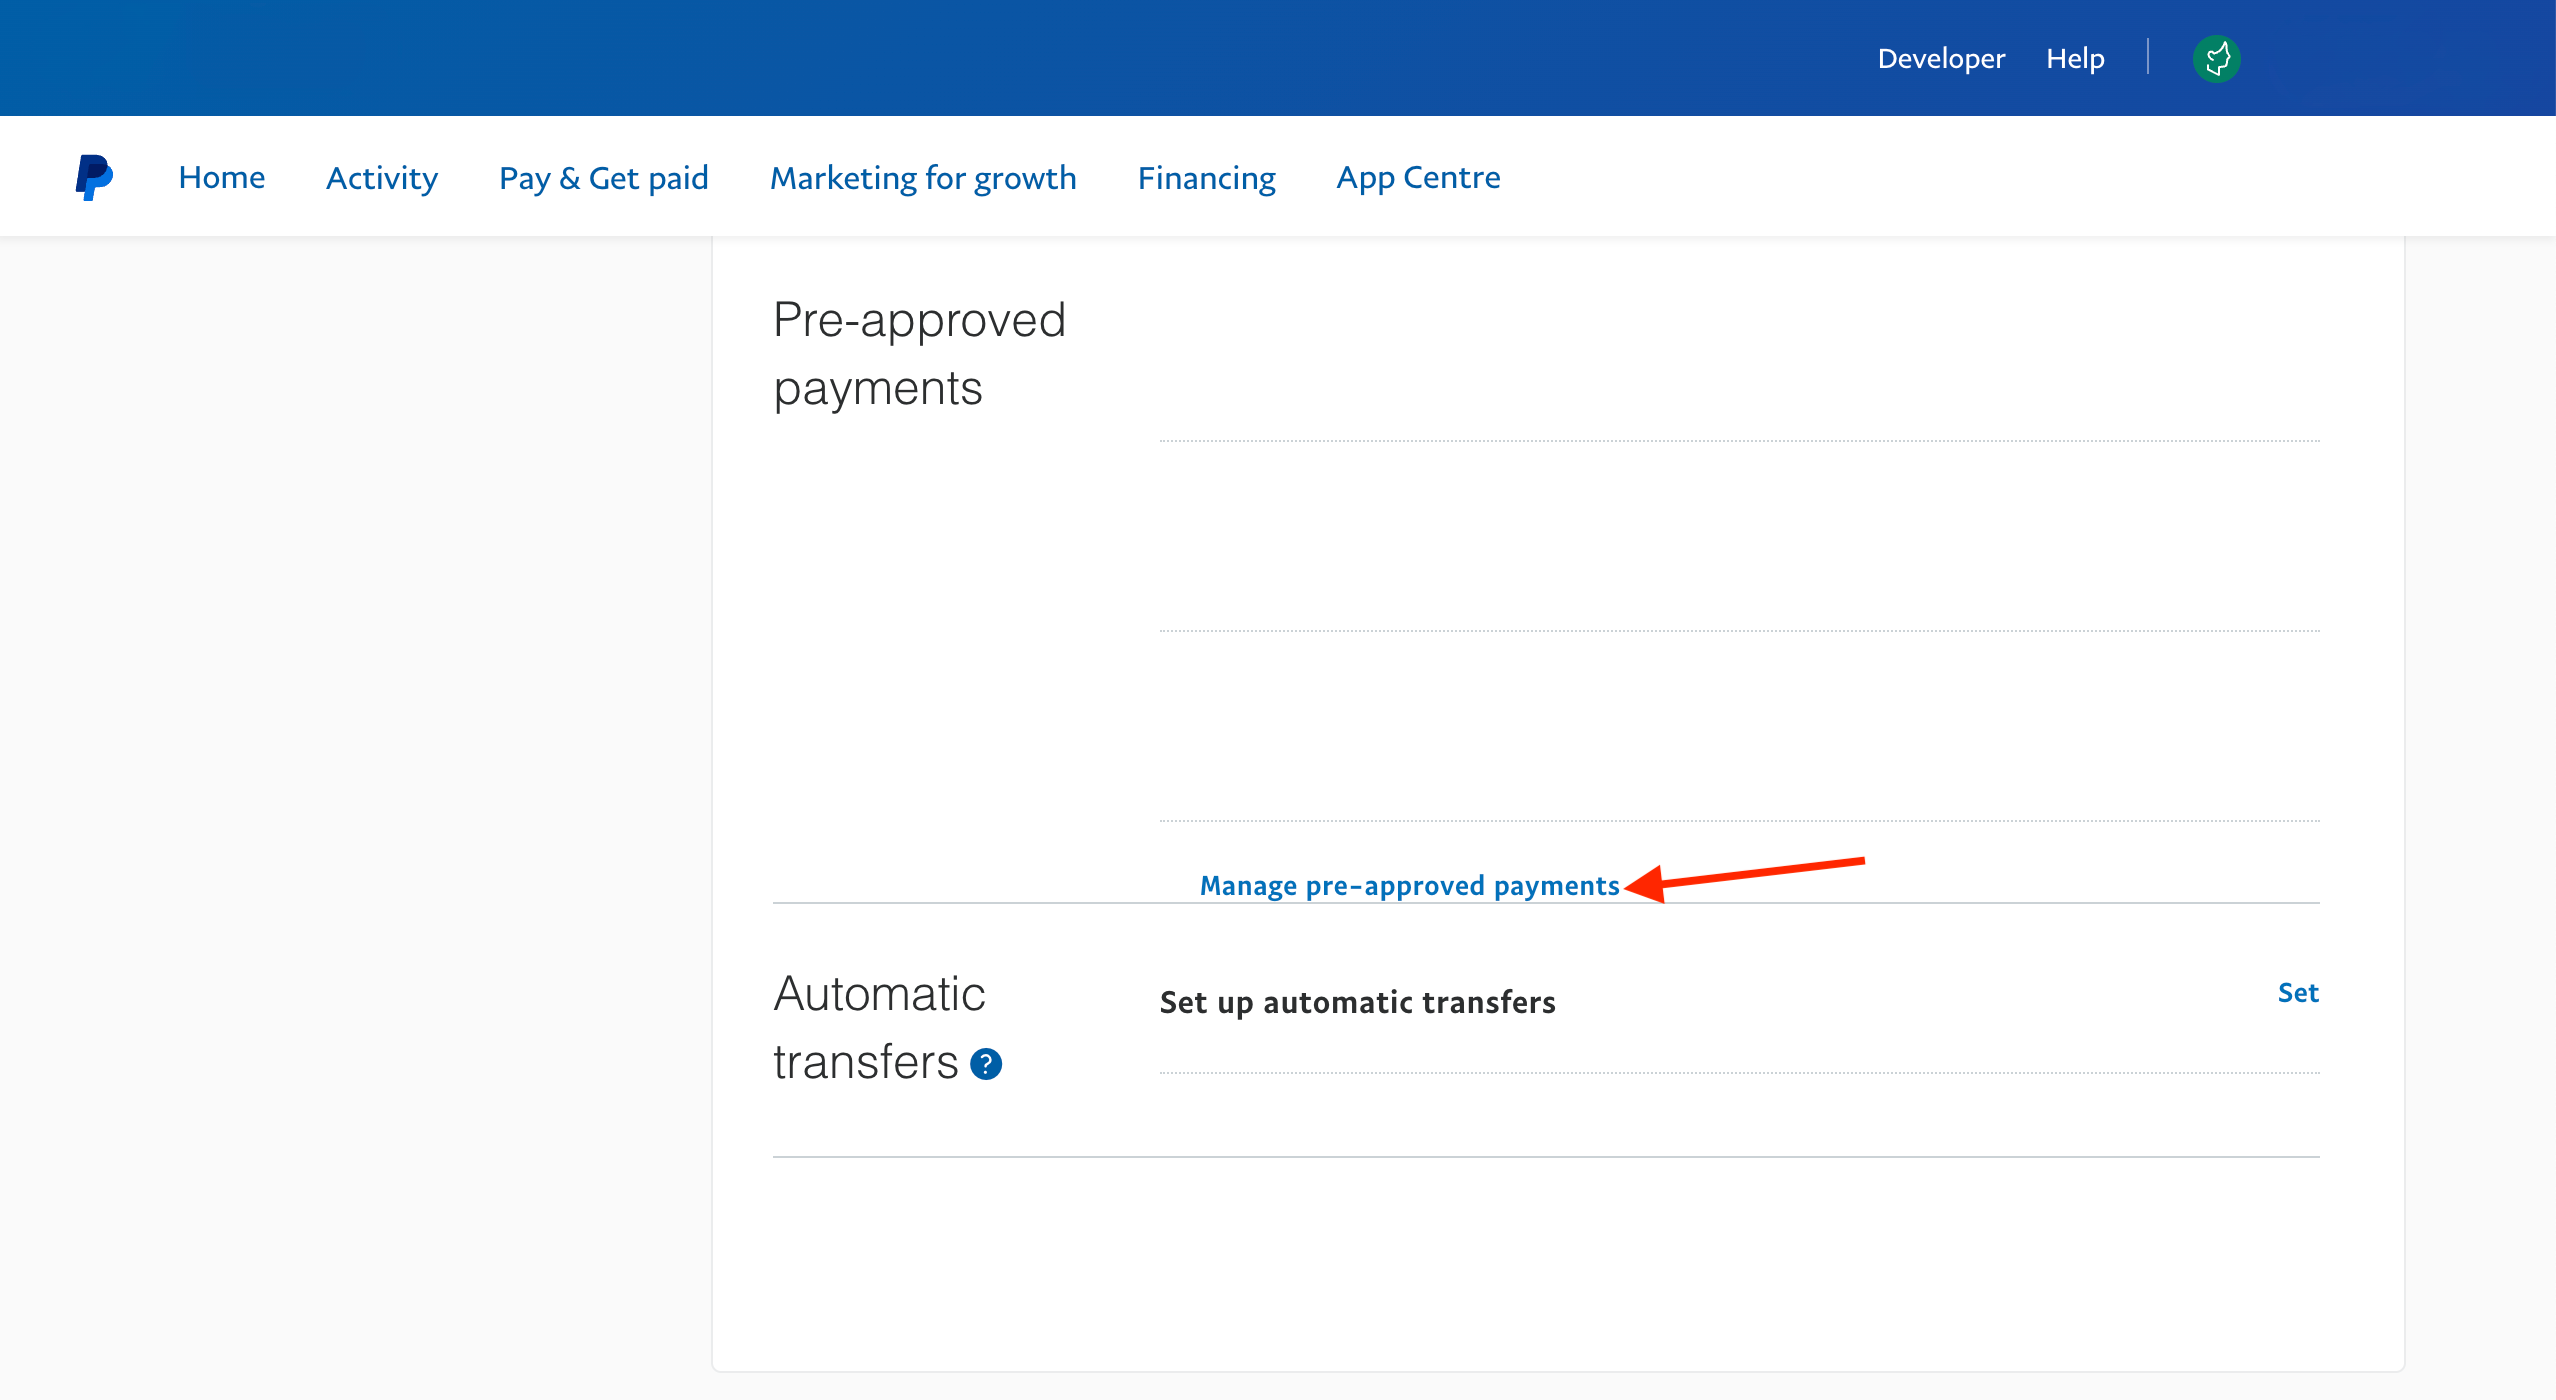
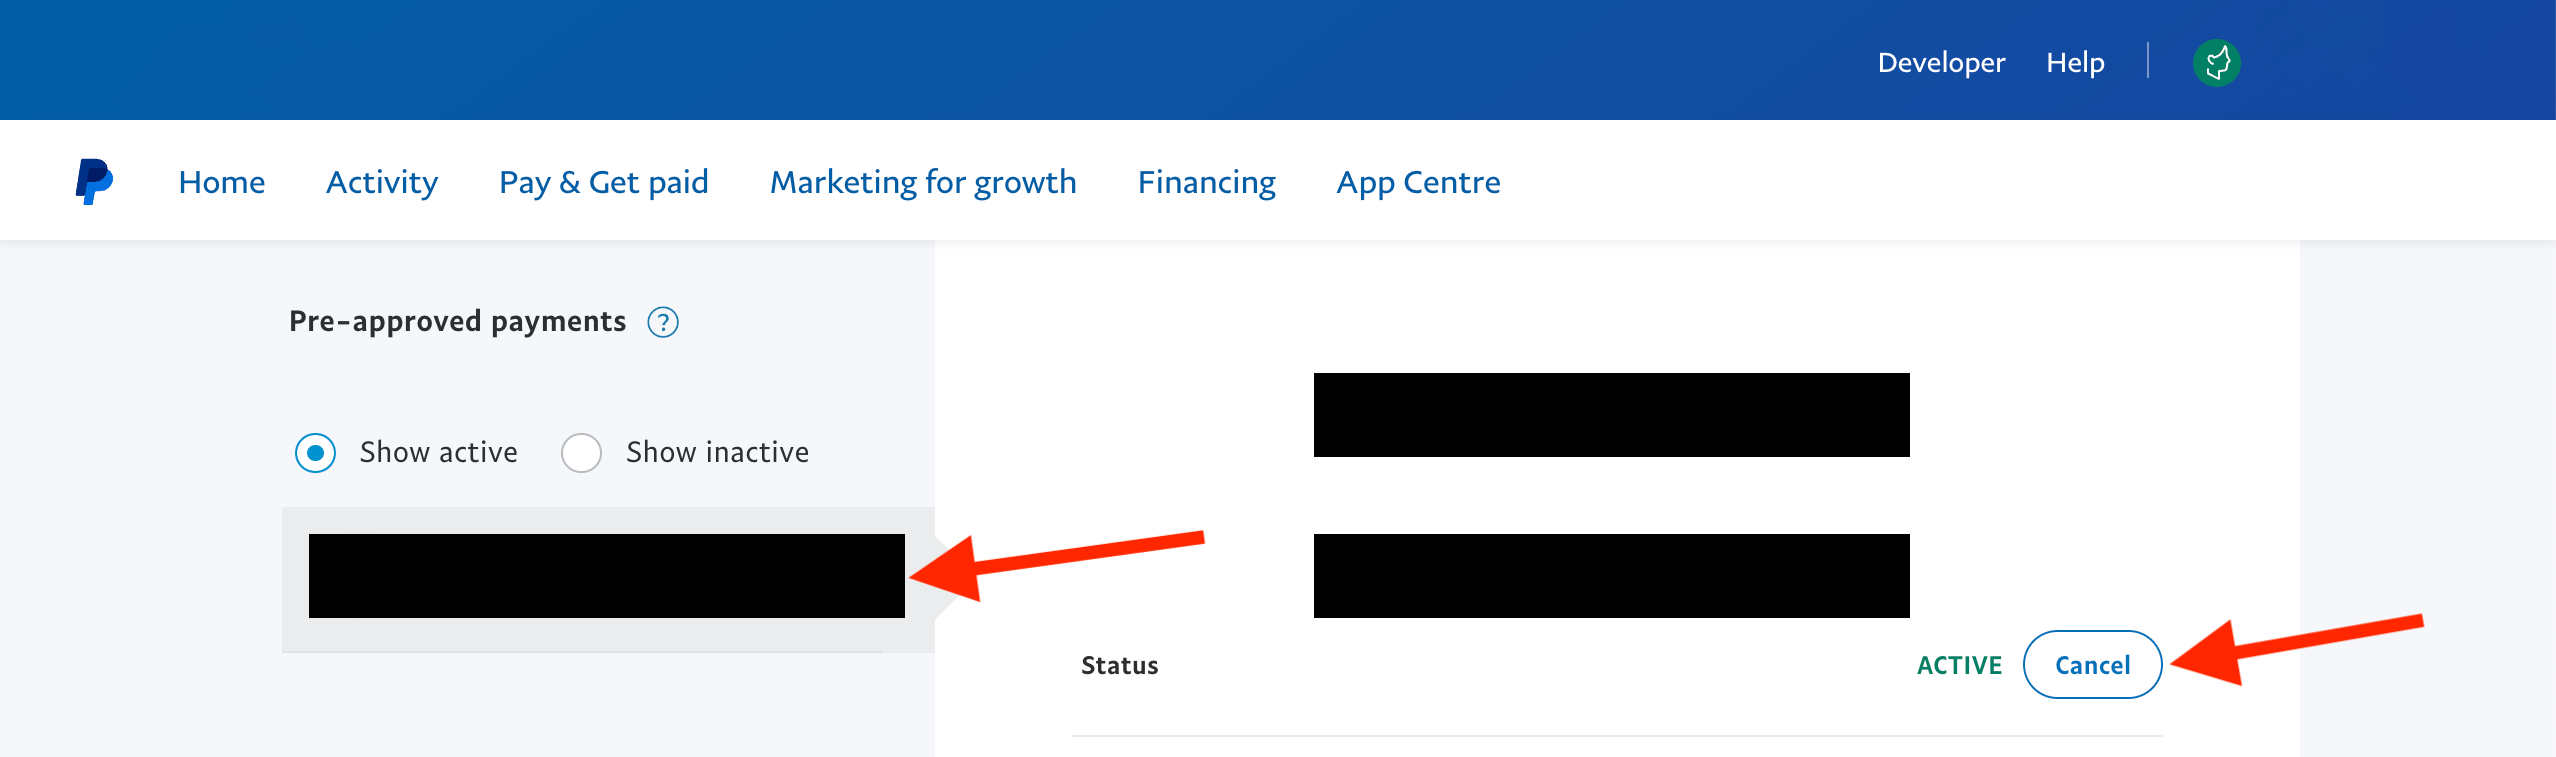
To review outgoing pre-approved payments for a PayPal Business account on the PayPal website, open your account settings and select “Money, banks and cards” > “Manage pre-approved payments.”
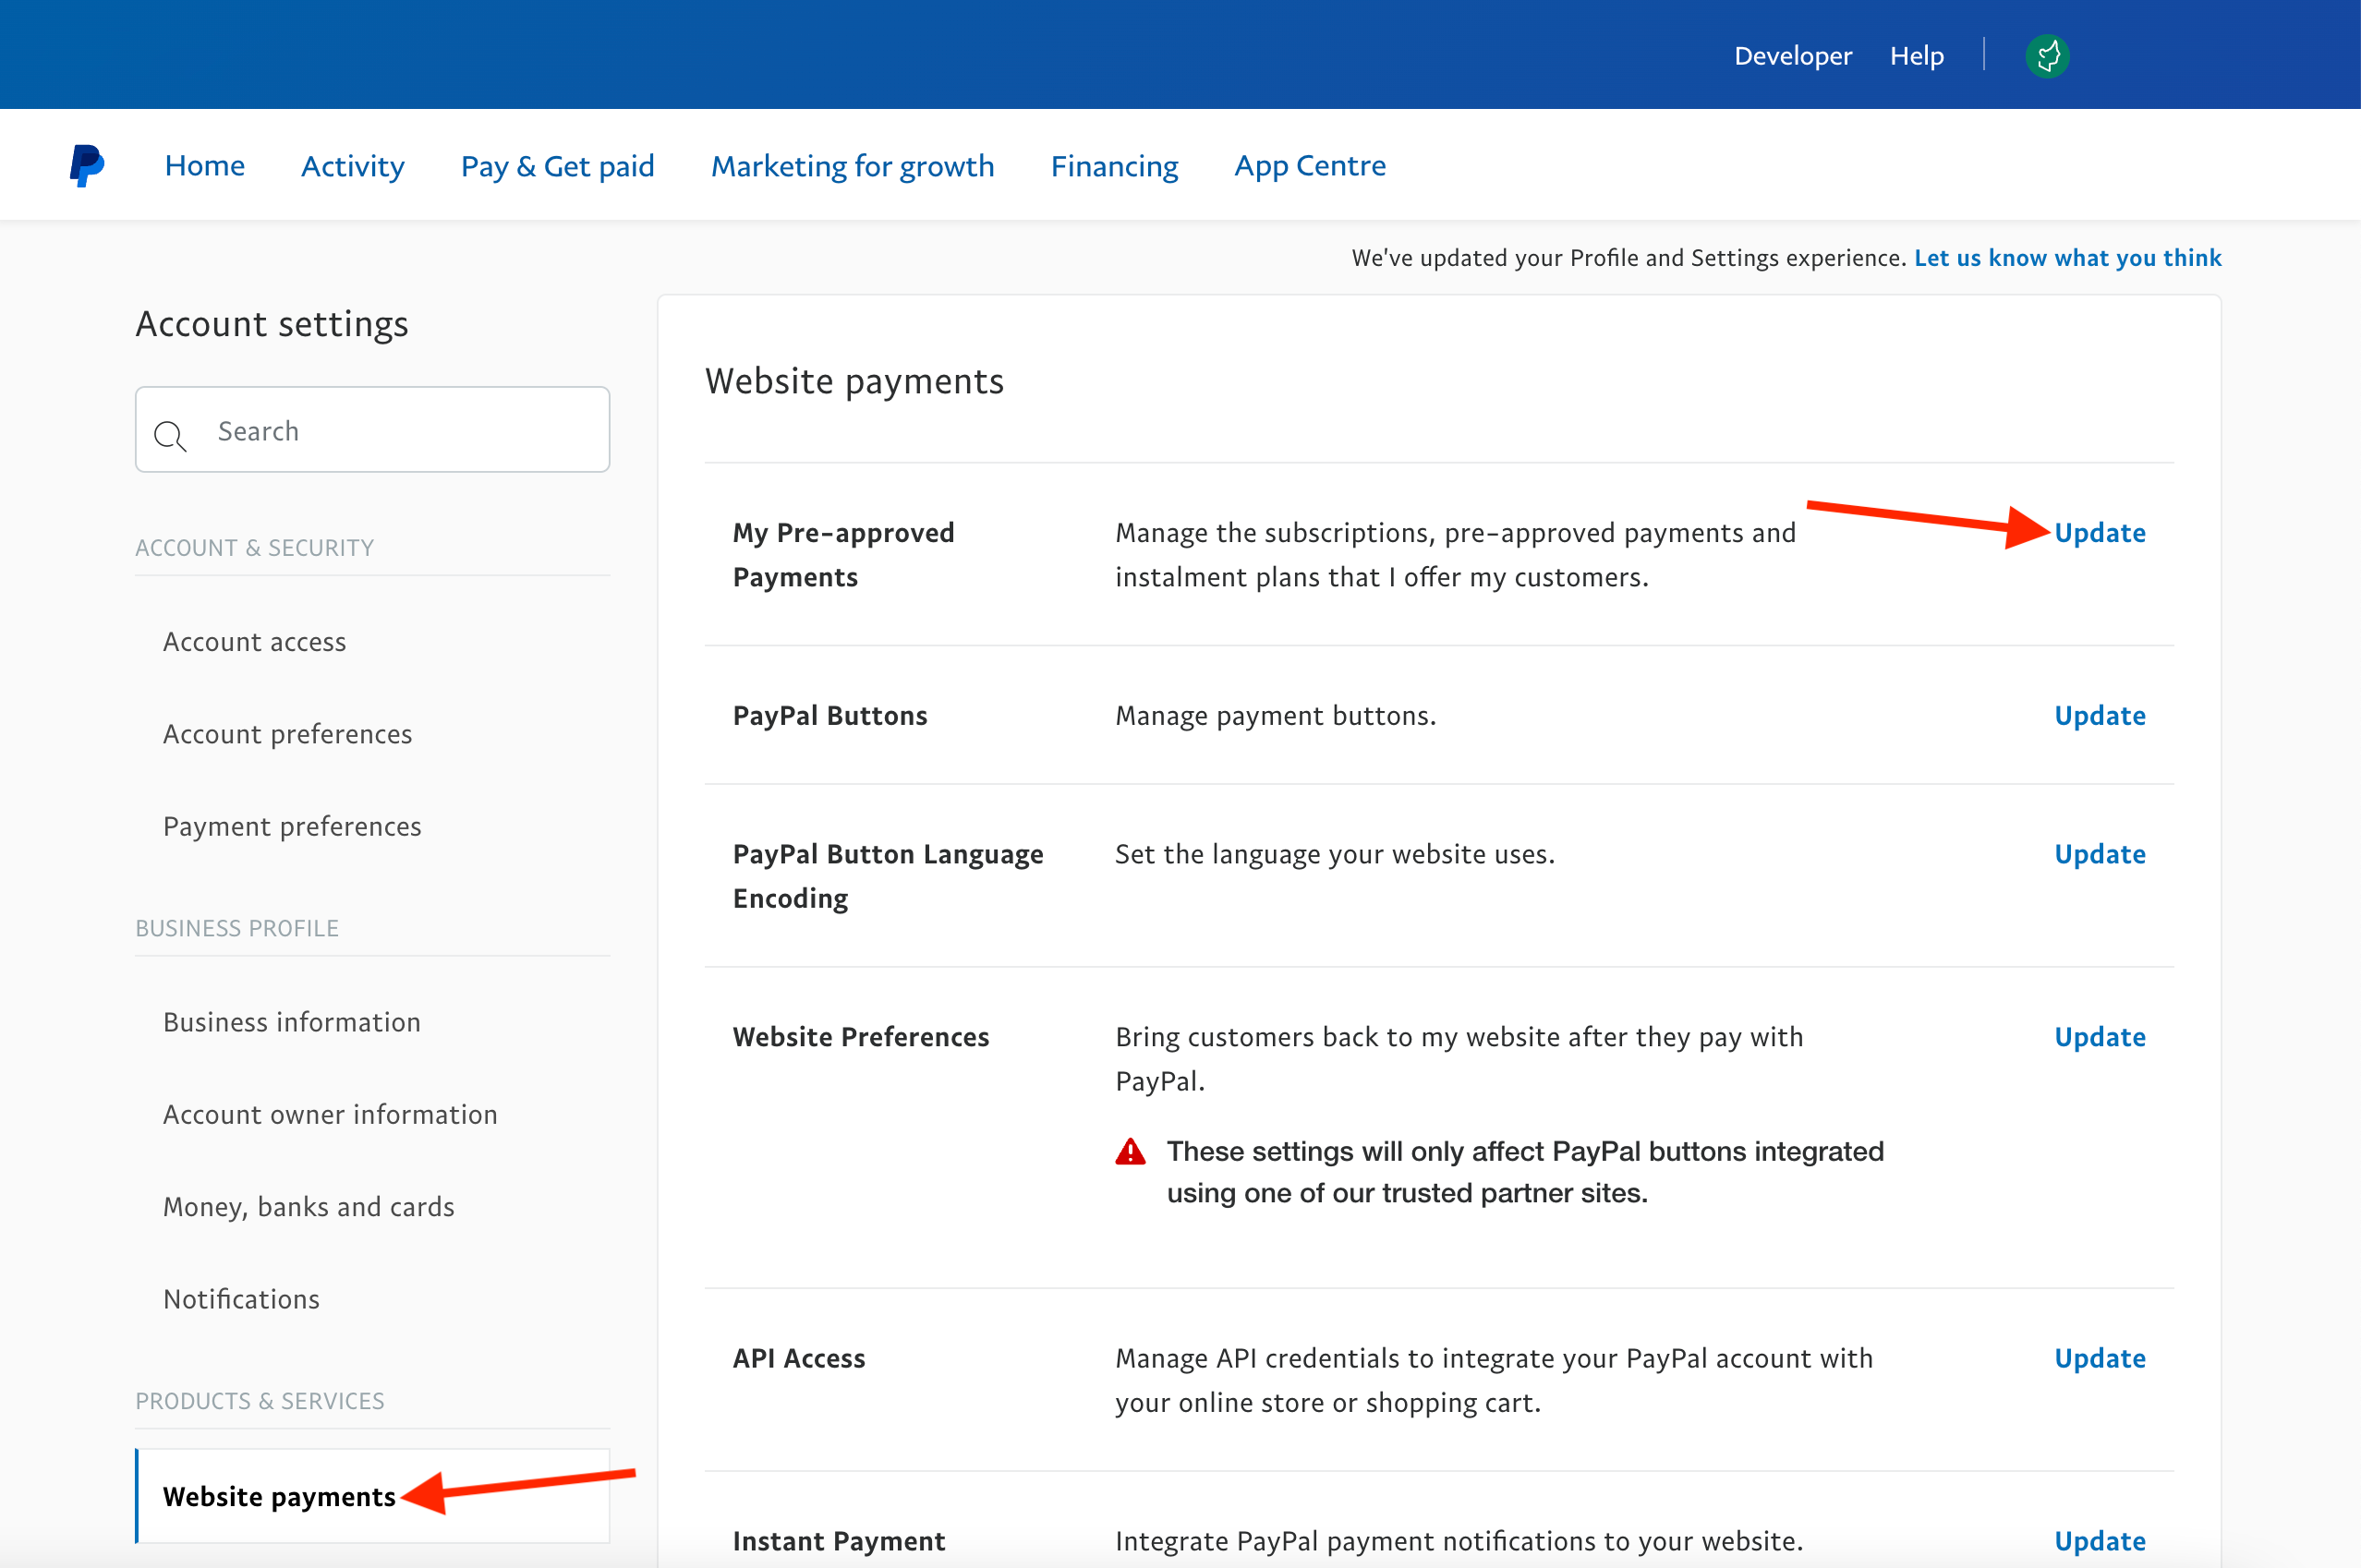
To review incoming pre-approved payments for a PayPal Business account on the PayPal website, open your account settings, select “Website payments,” and click or tap “Update” in the “My Pre-approved Payments” section.
Reviewing your other payments
You can review other payments to and from your PayPal account by browsing your transaction history.
The PayPal website and PayPal app contain a full log of your transaction history while the PayPal Business app provides a limited log of your previous transactions.
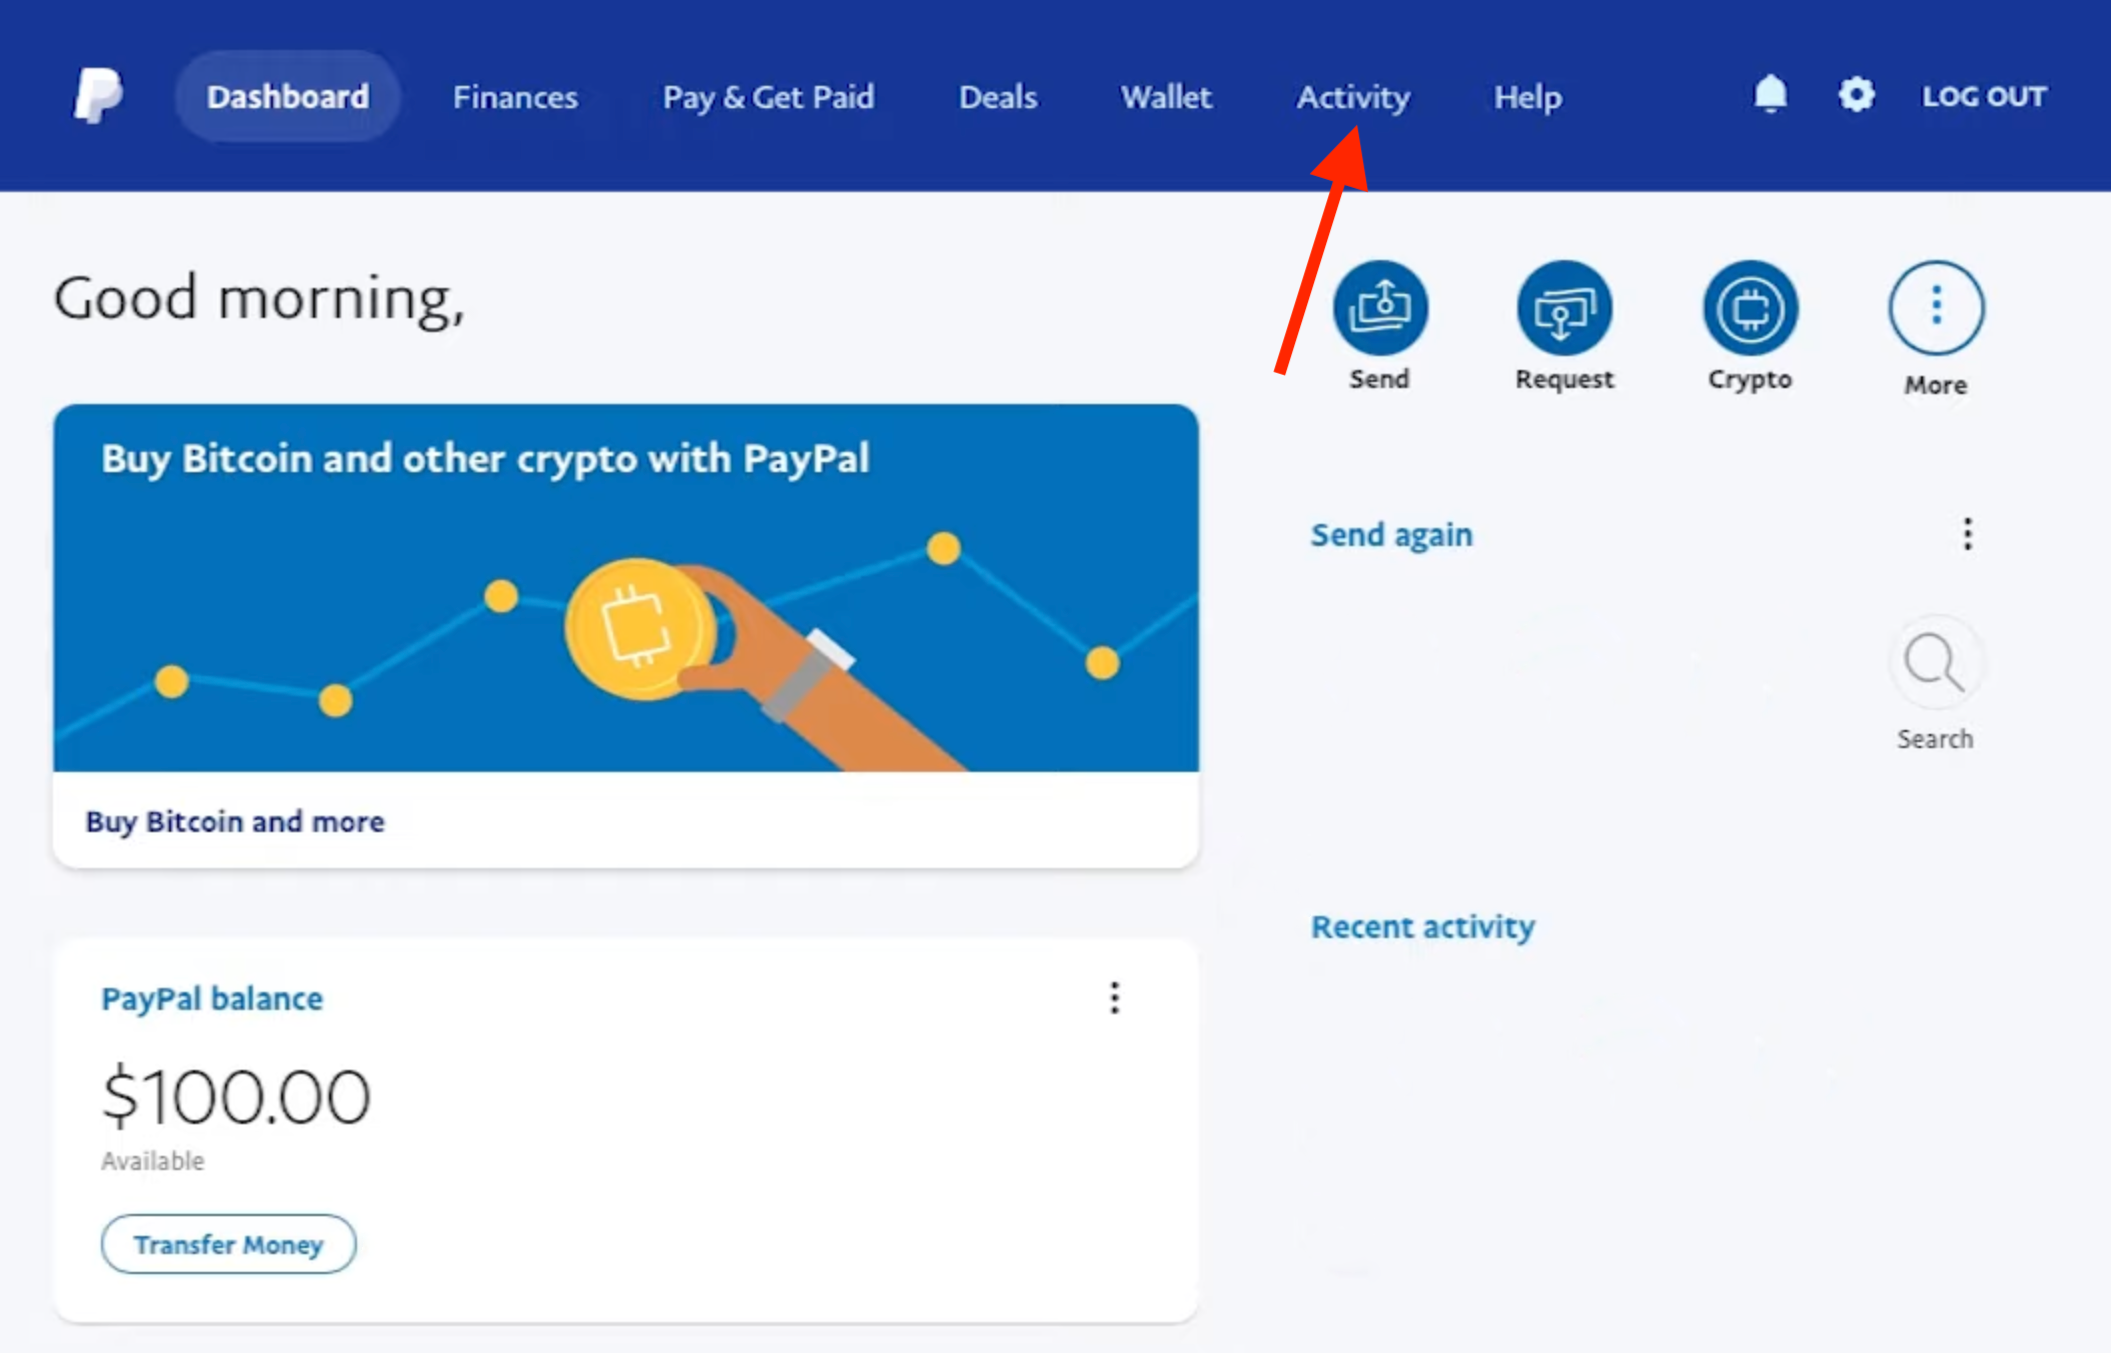
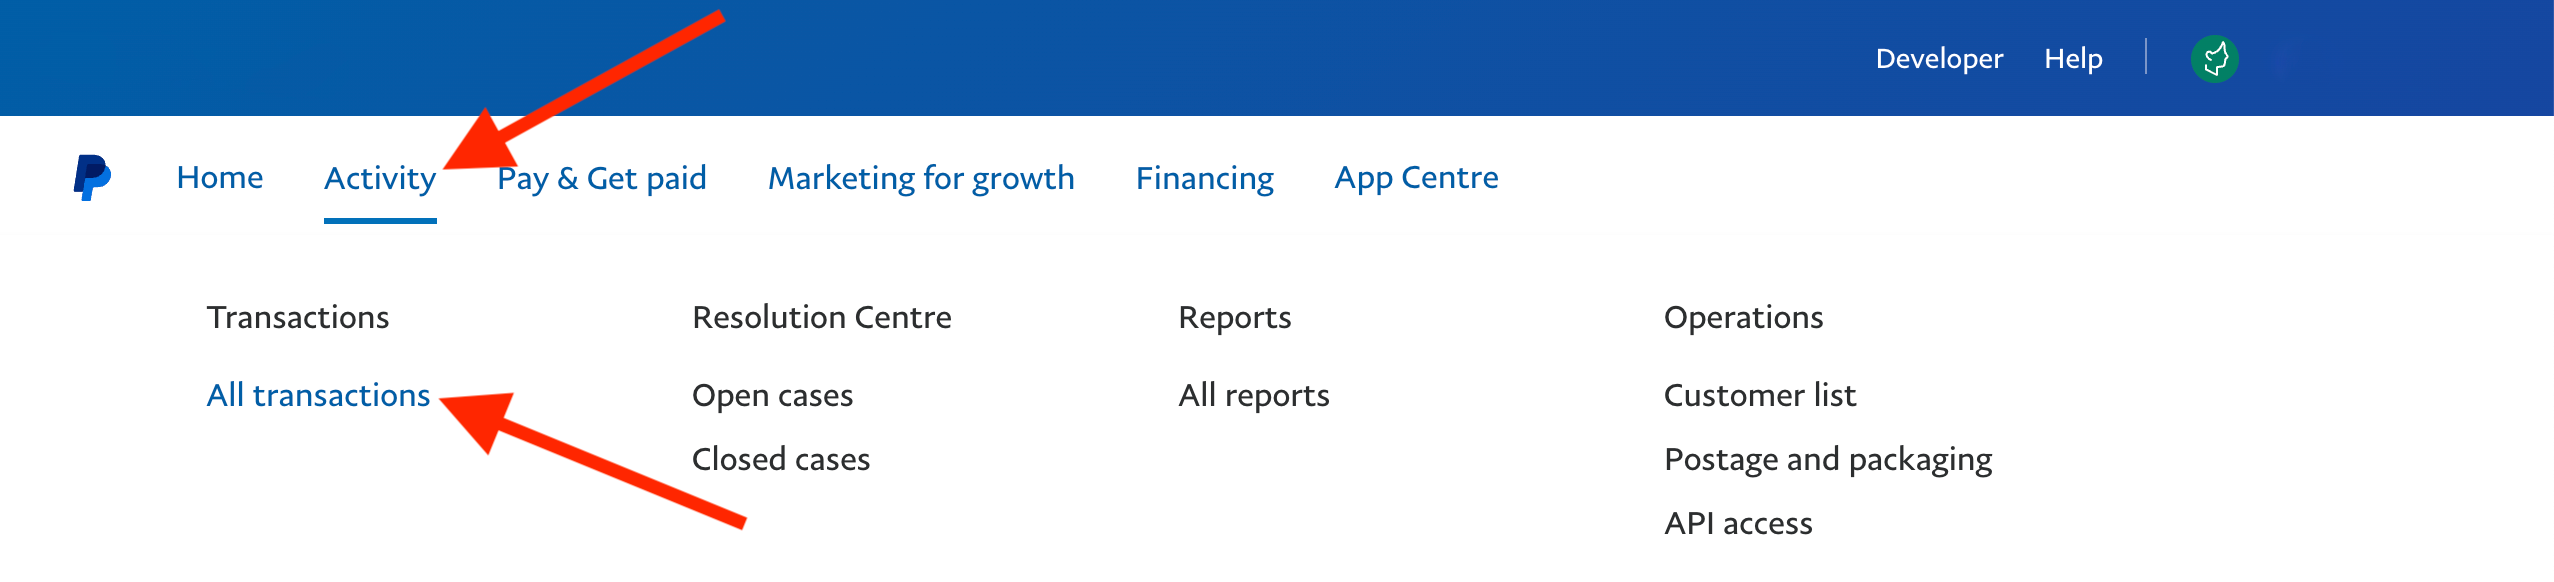
To browse the transaction history for any PayPal account on the PayPal website, click or tap “Activity.”
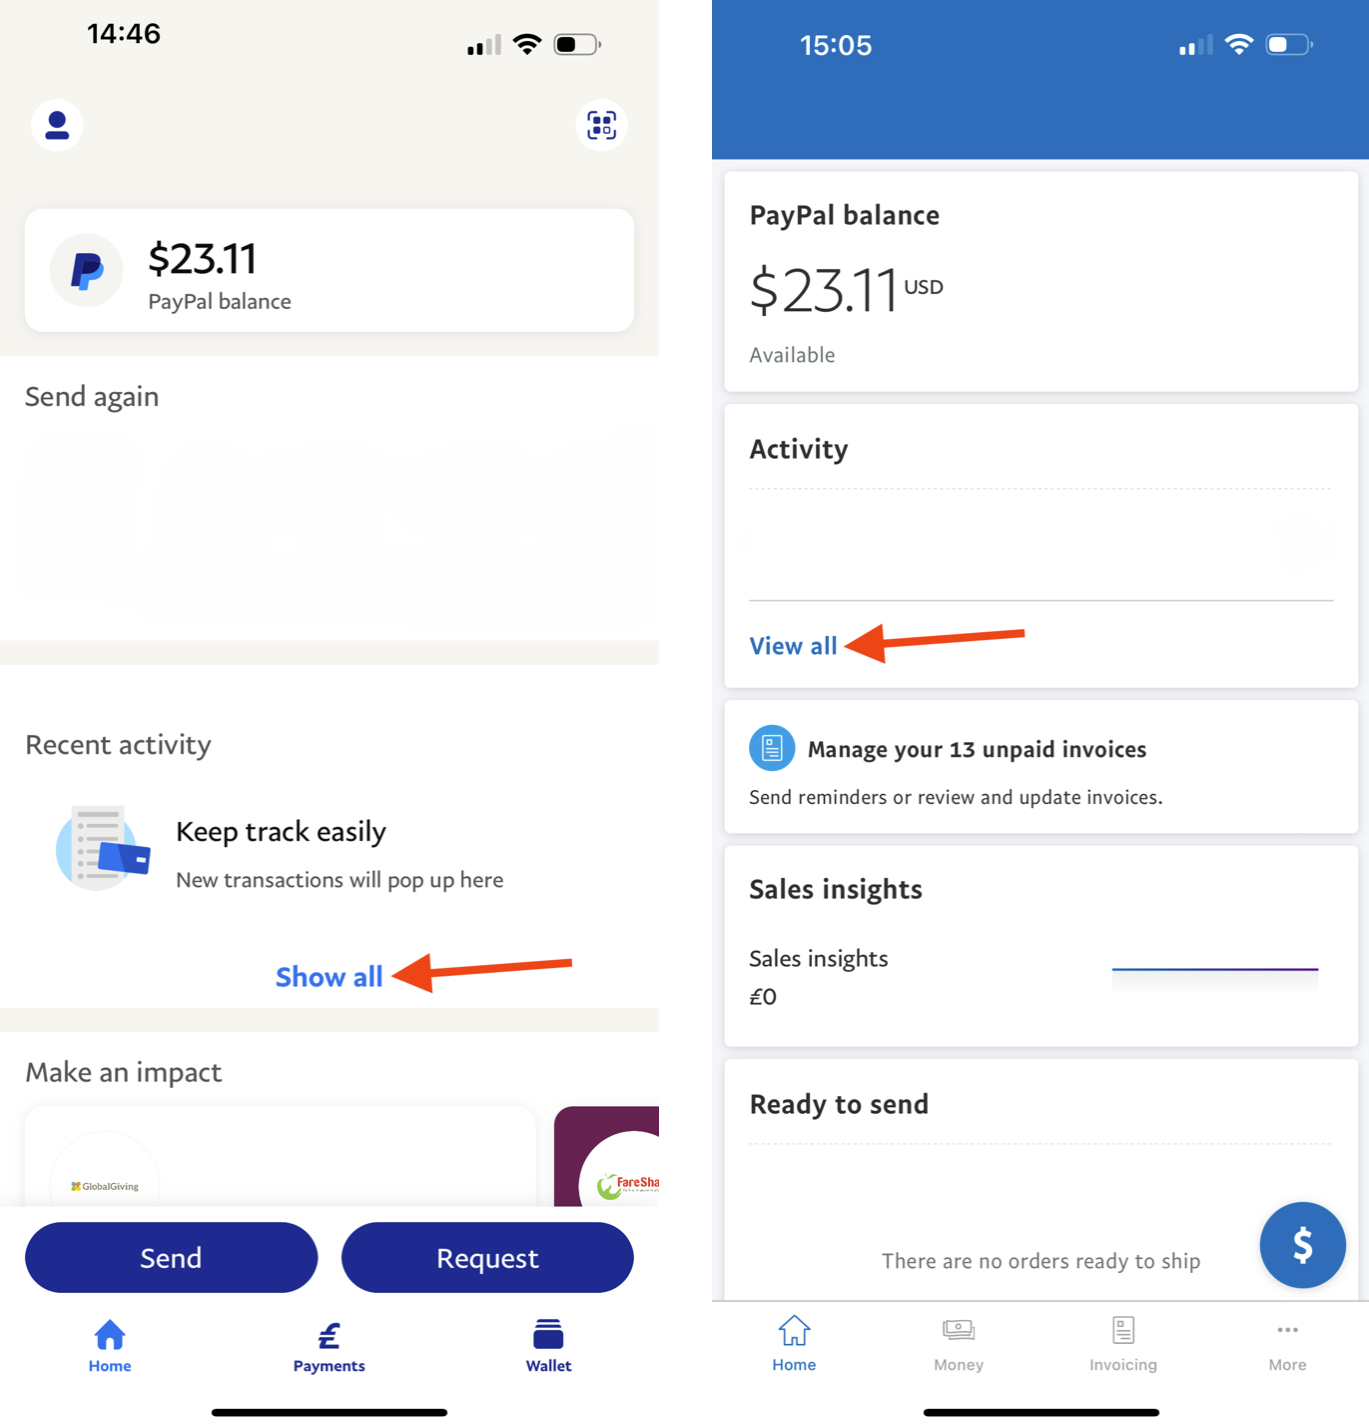
To browse the transaction history for a personal account in the PayPal app, tap the “Show all” link in the “Recent activity” section.
To browse the transaction history for a PayPal Business account in the PayPal Business app, tap the “View all” link in the “Activity” section.
Canceling payments
To cancel an outgoing recurring payment on the PayPal website, click or tap on the payment and select “Cancel.”
To cancel a recurring payment on the PayPal app, tap the payment and select “Remove PayPal as your payment method.”
Redirecting outgoing recurring payments
If you want to stay subscribed to any of the services associated with your recurring payments, you’ll need to set up an alternative payment method before canceling the PayPal payment.
To do this, log in to the associated service and set up an alternative payment method. Once this alternative payment method has been set up, you can cancel your PayPal payment.
Redirecting incoming payments
If you want to keep receiving one-time or recurring payments, you’ll need to set up an alternative method for receiving the payments, let the payees know that you’re closing your PayPal account, and give them your updated payment details.
3. Download your records
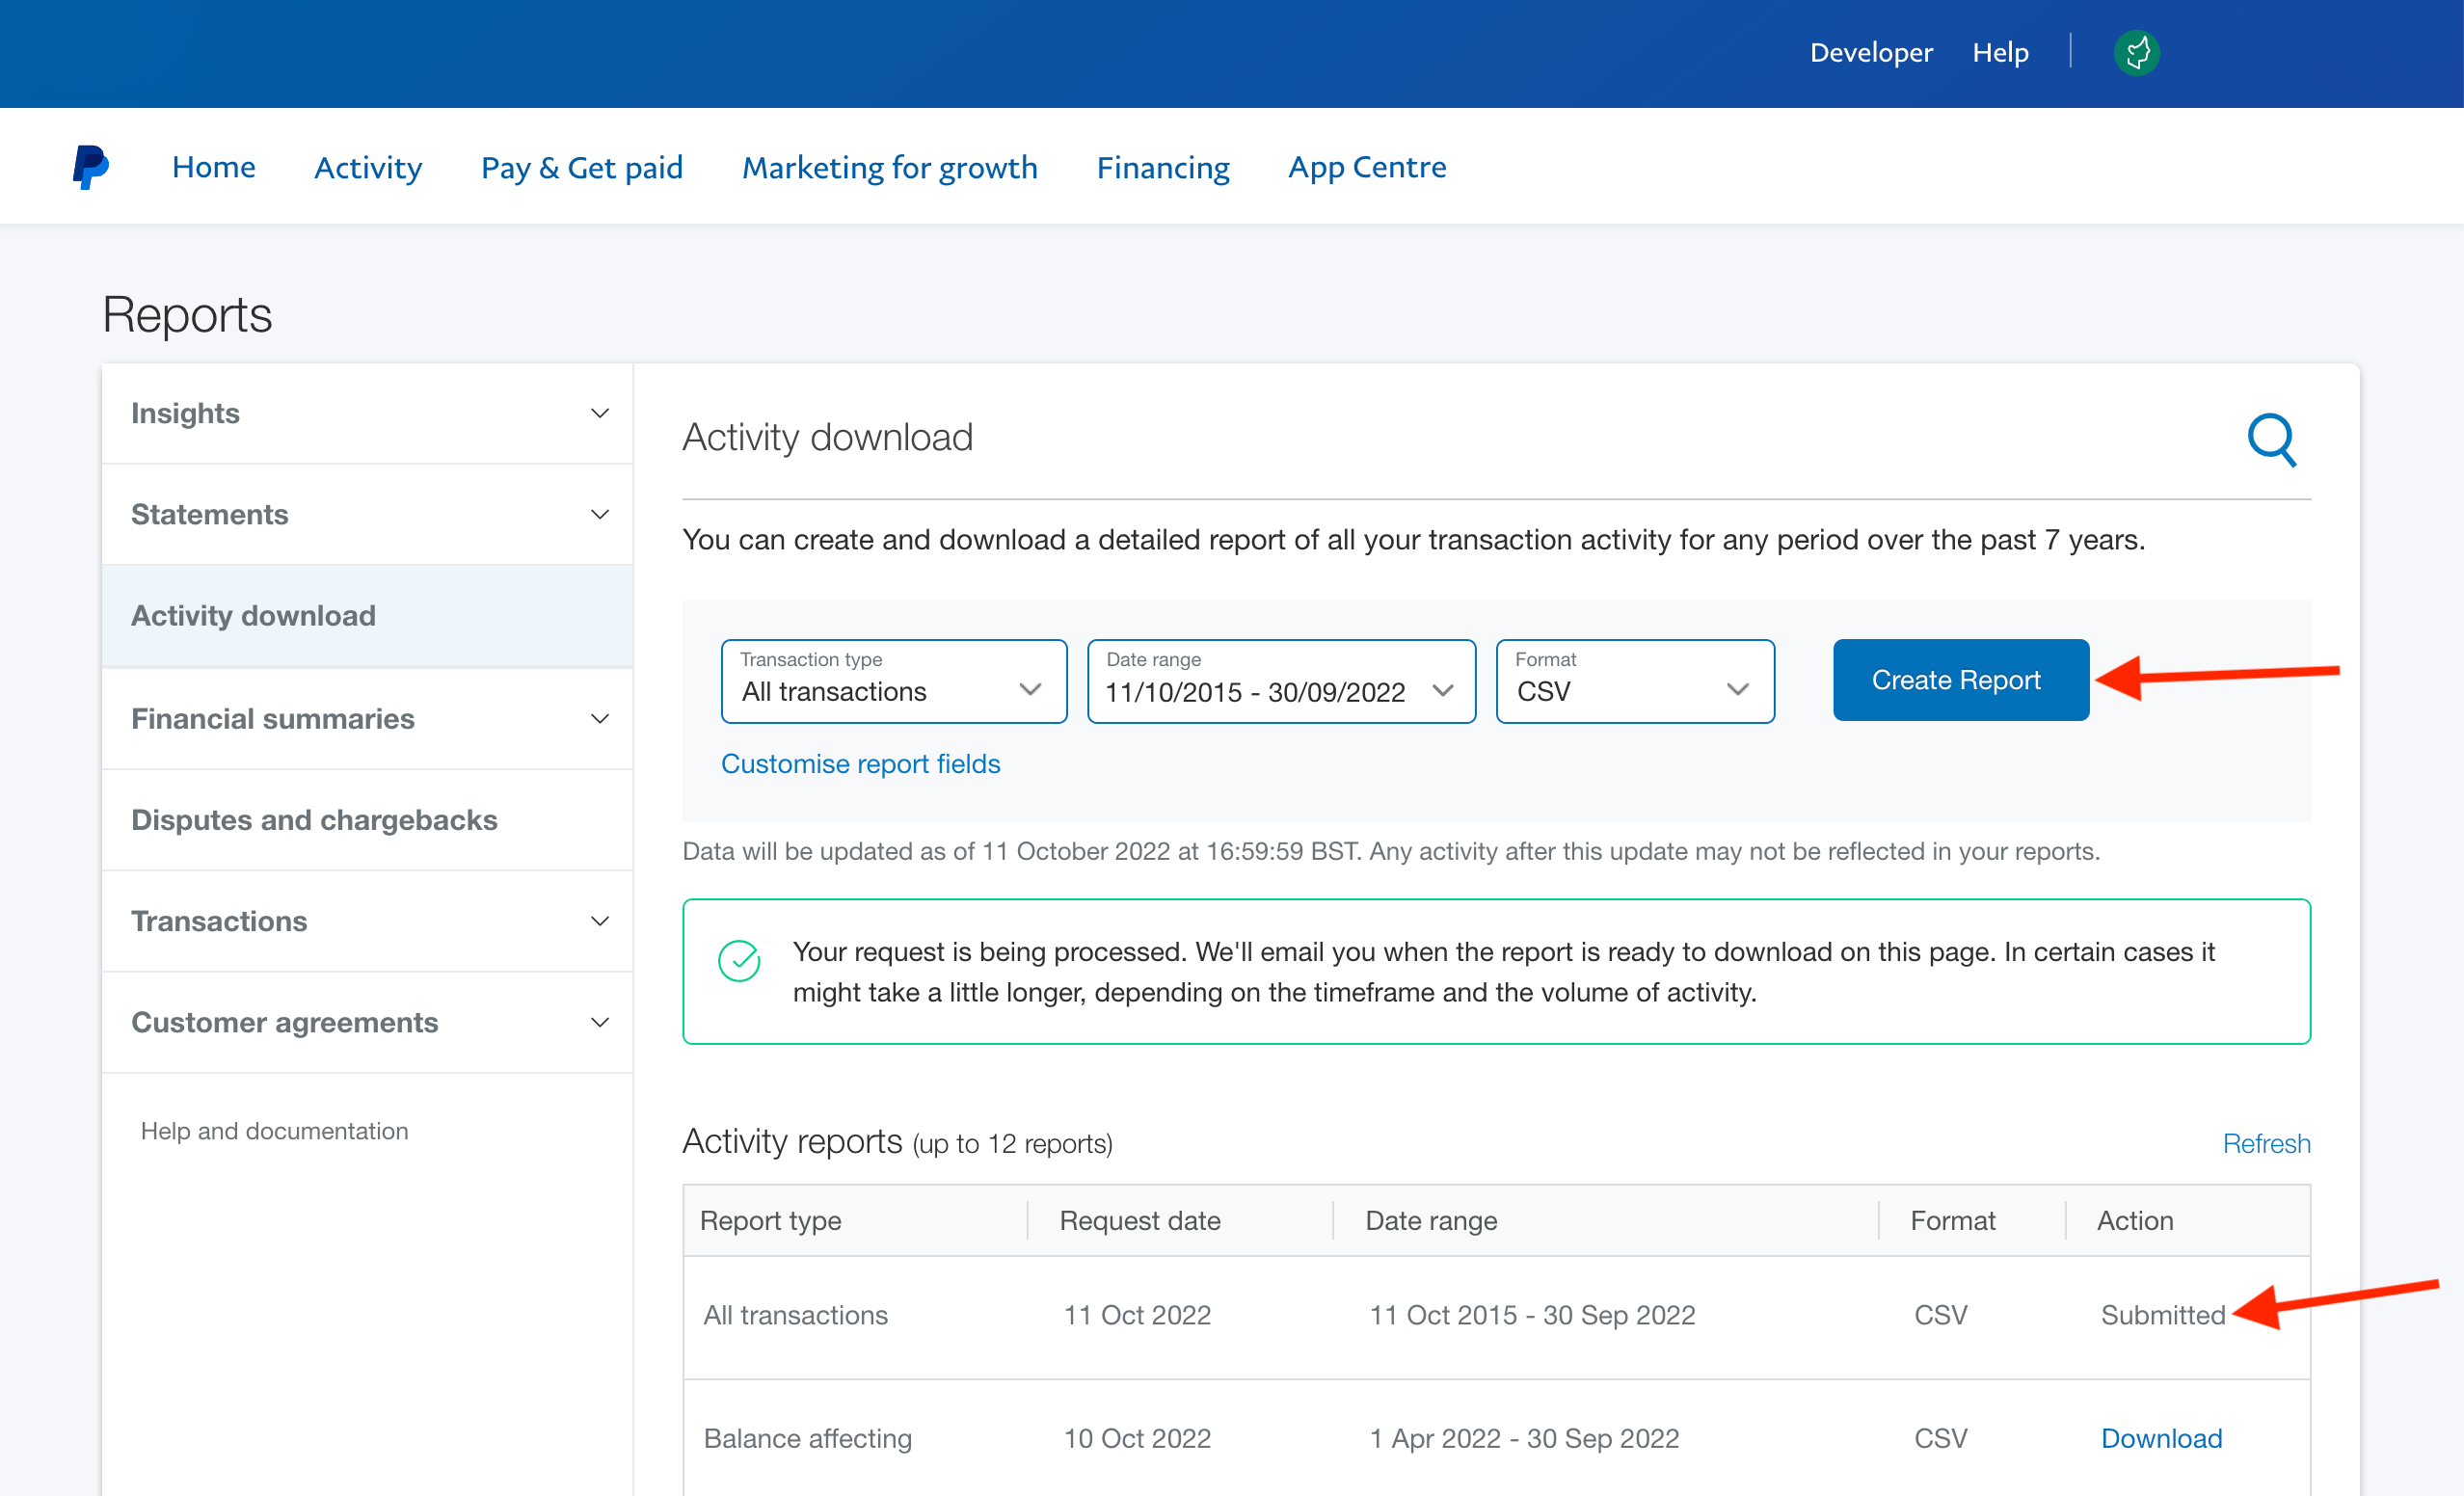
You can use the PayPal website’s “Activity download” tool to download up to seven years worth of historical PayPal transactions.
To access this Activity download tool, click or tap “Activity” > “All transactions” > “Download.”

Then set “Transaction type” to “All transactions,” adjust the “Date range” to include the full seven years of transaction history, choose your preferred “Format,” and select “Create Report.”
PayPal will email you when your report is ready. Once the report is ready, you can download it from the “Activity reports” section of the Activity download page.
Deleting your account
After you’ve completed all the preparatory steps, you can go ahead and delete your PayPal account by either deleting it directly or requesting that PayPal erase your personal data when they delete your account.
Requesting personal data deletion when deleting your PayPal account
If you want PayPal to erase your data when deleting a personal account, you’ll need to submit a request by contacting PayPal.
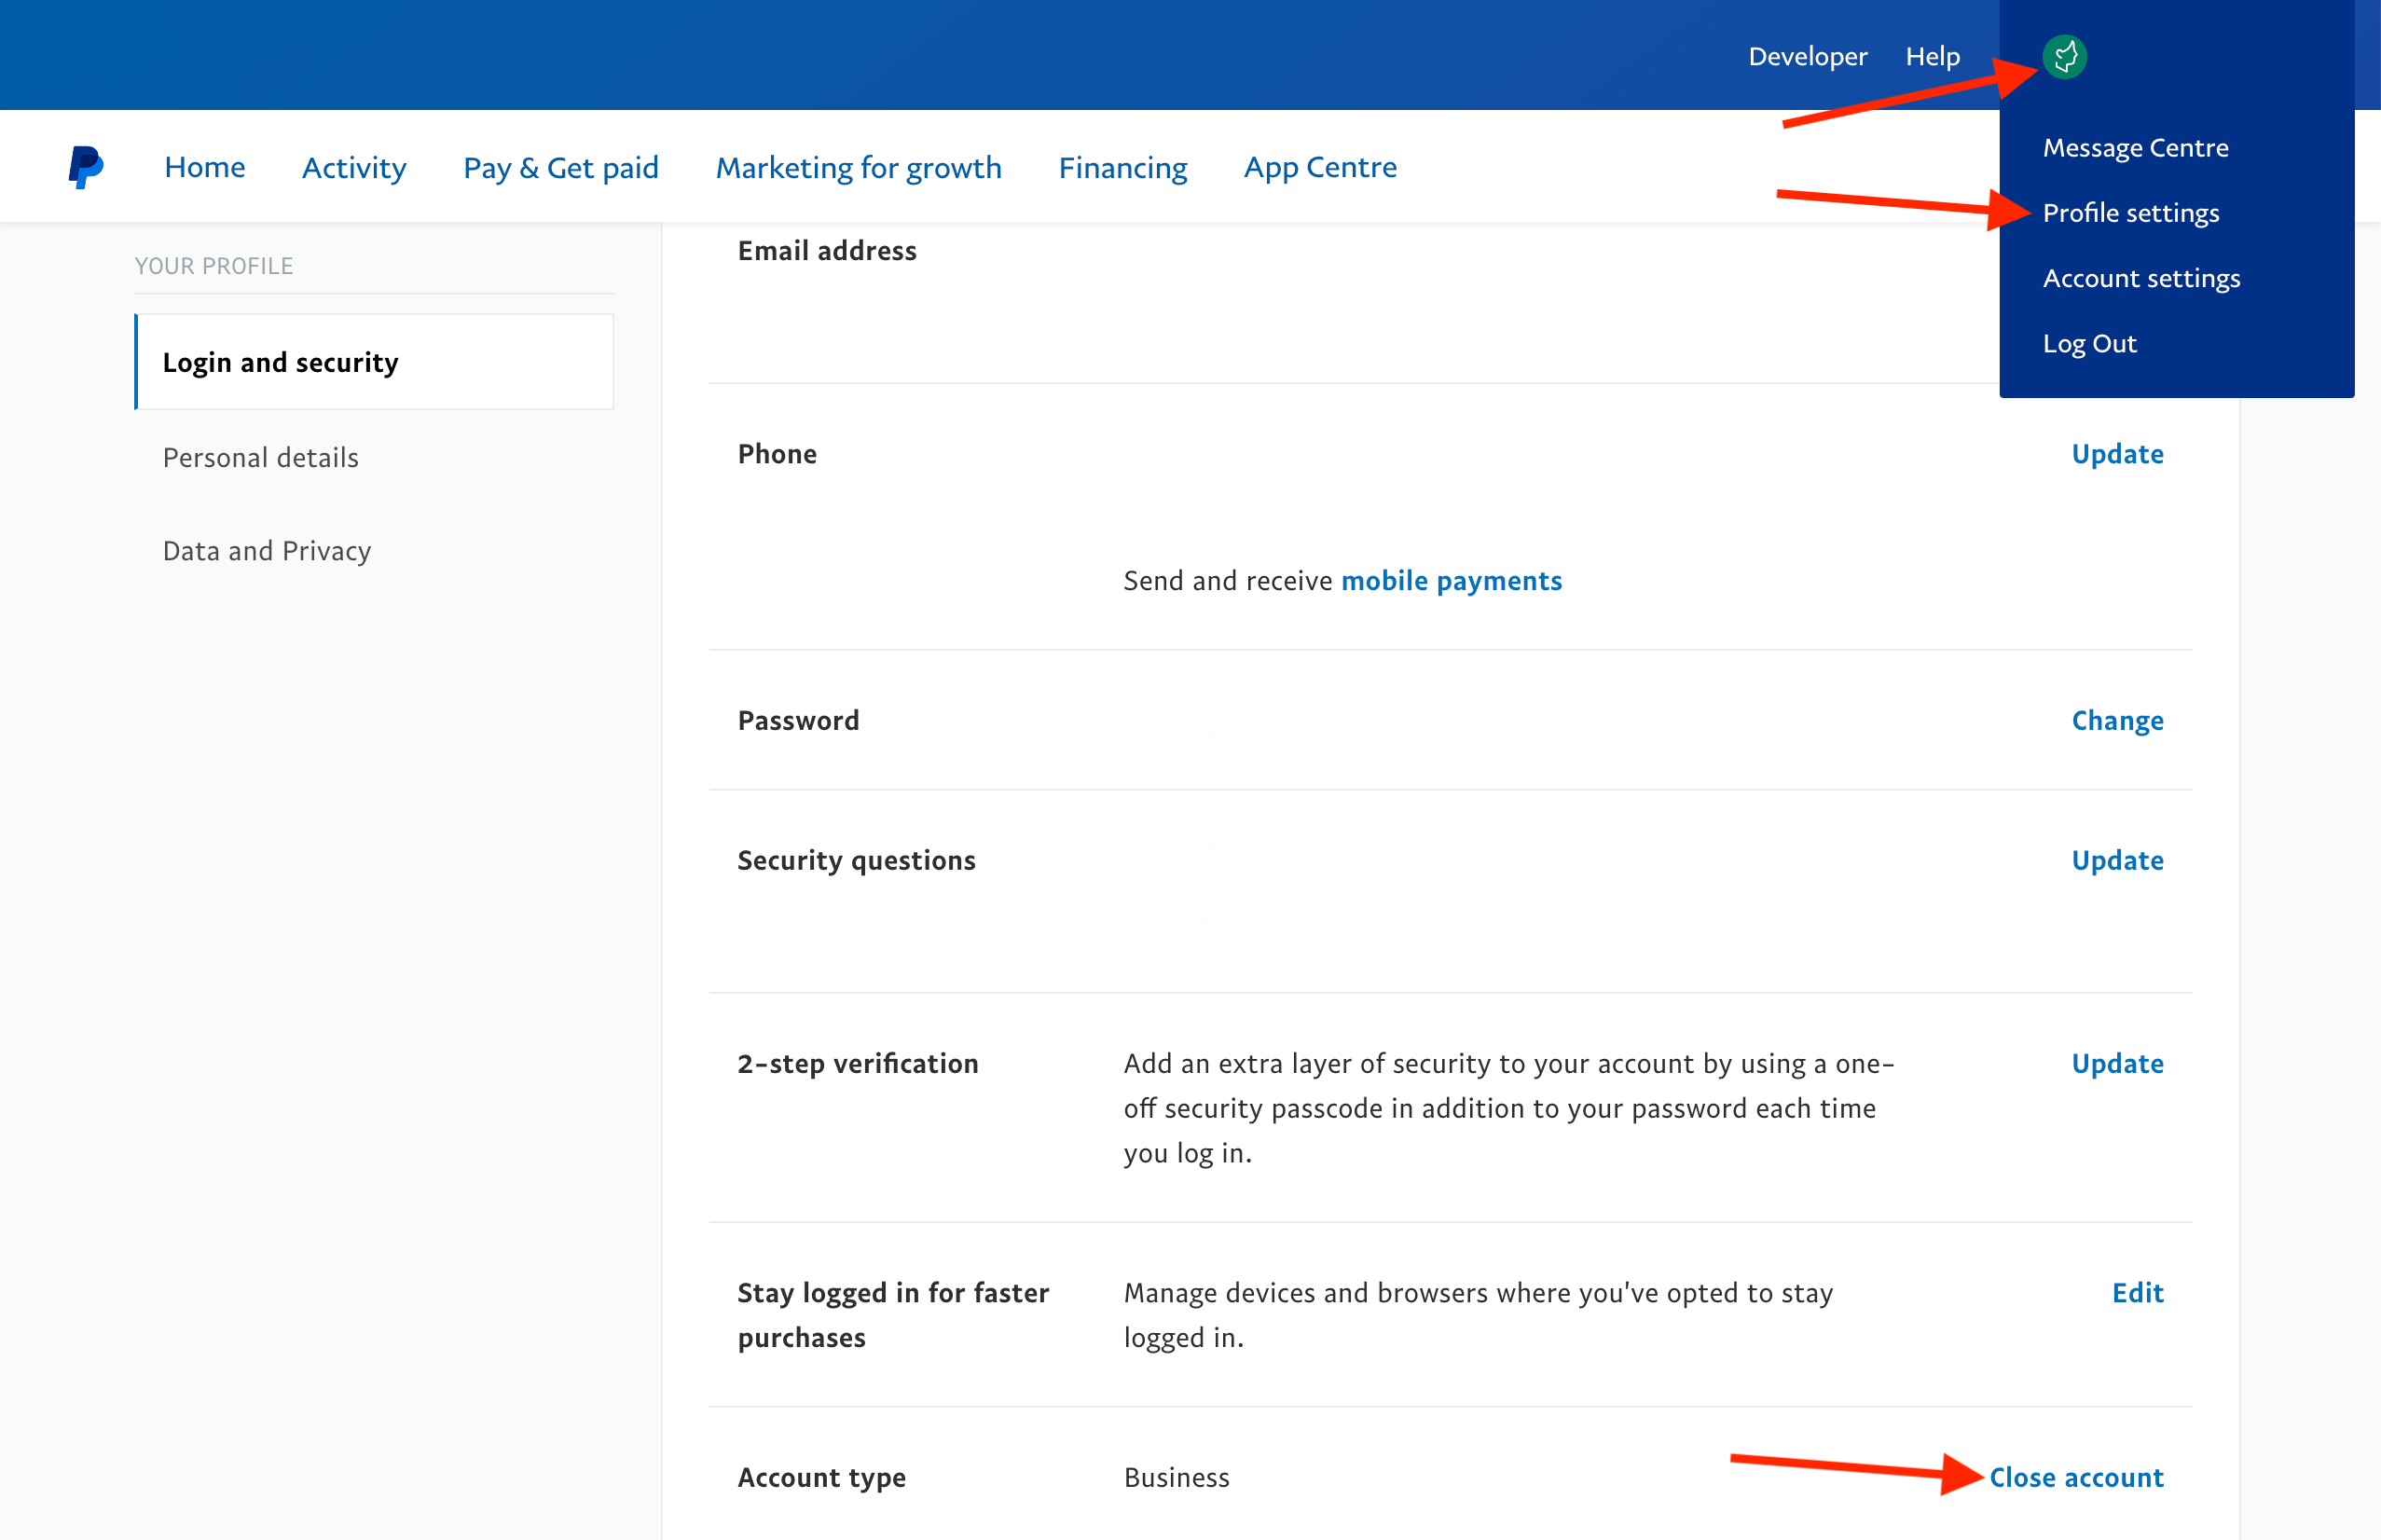
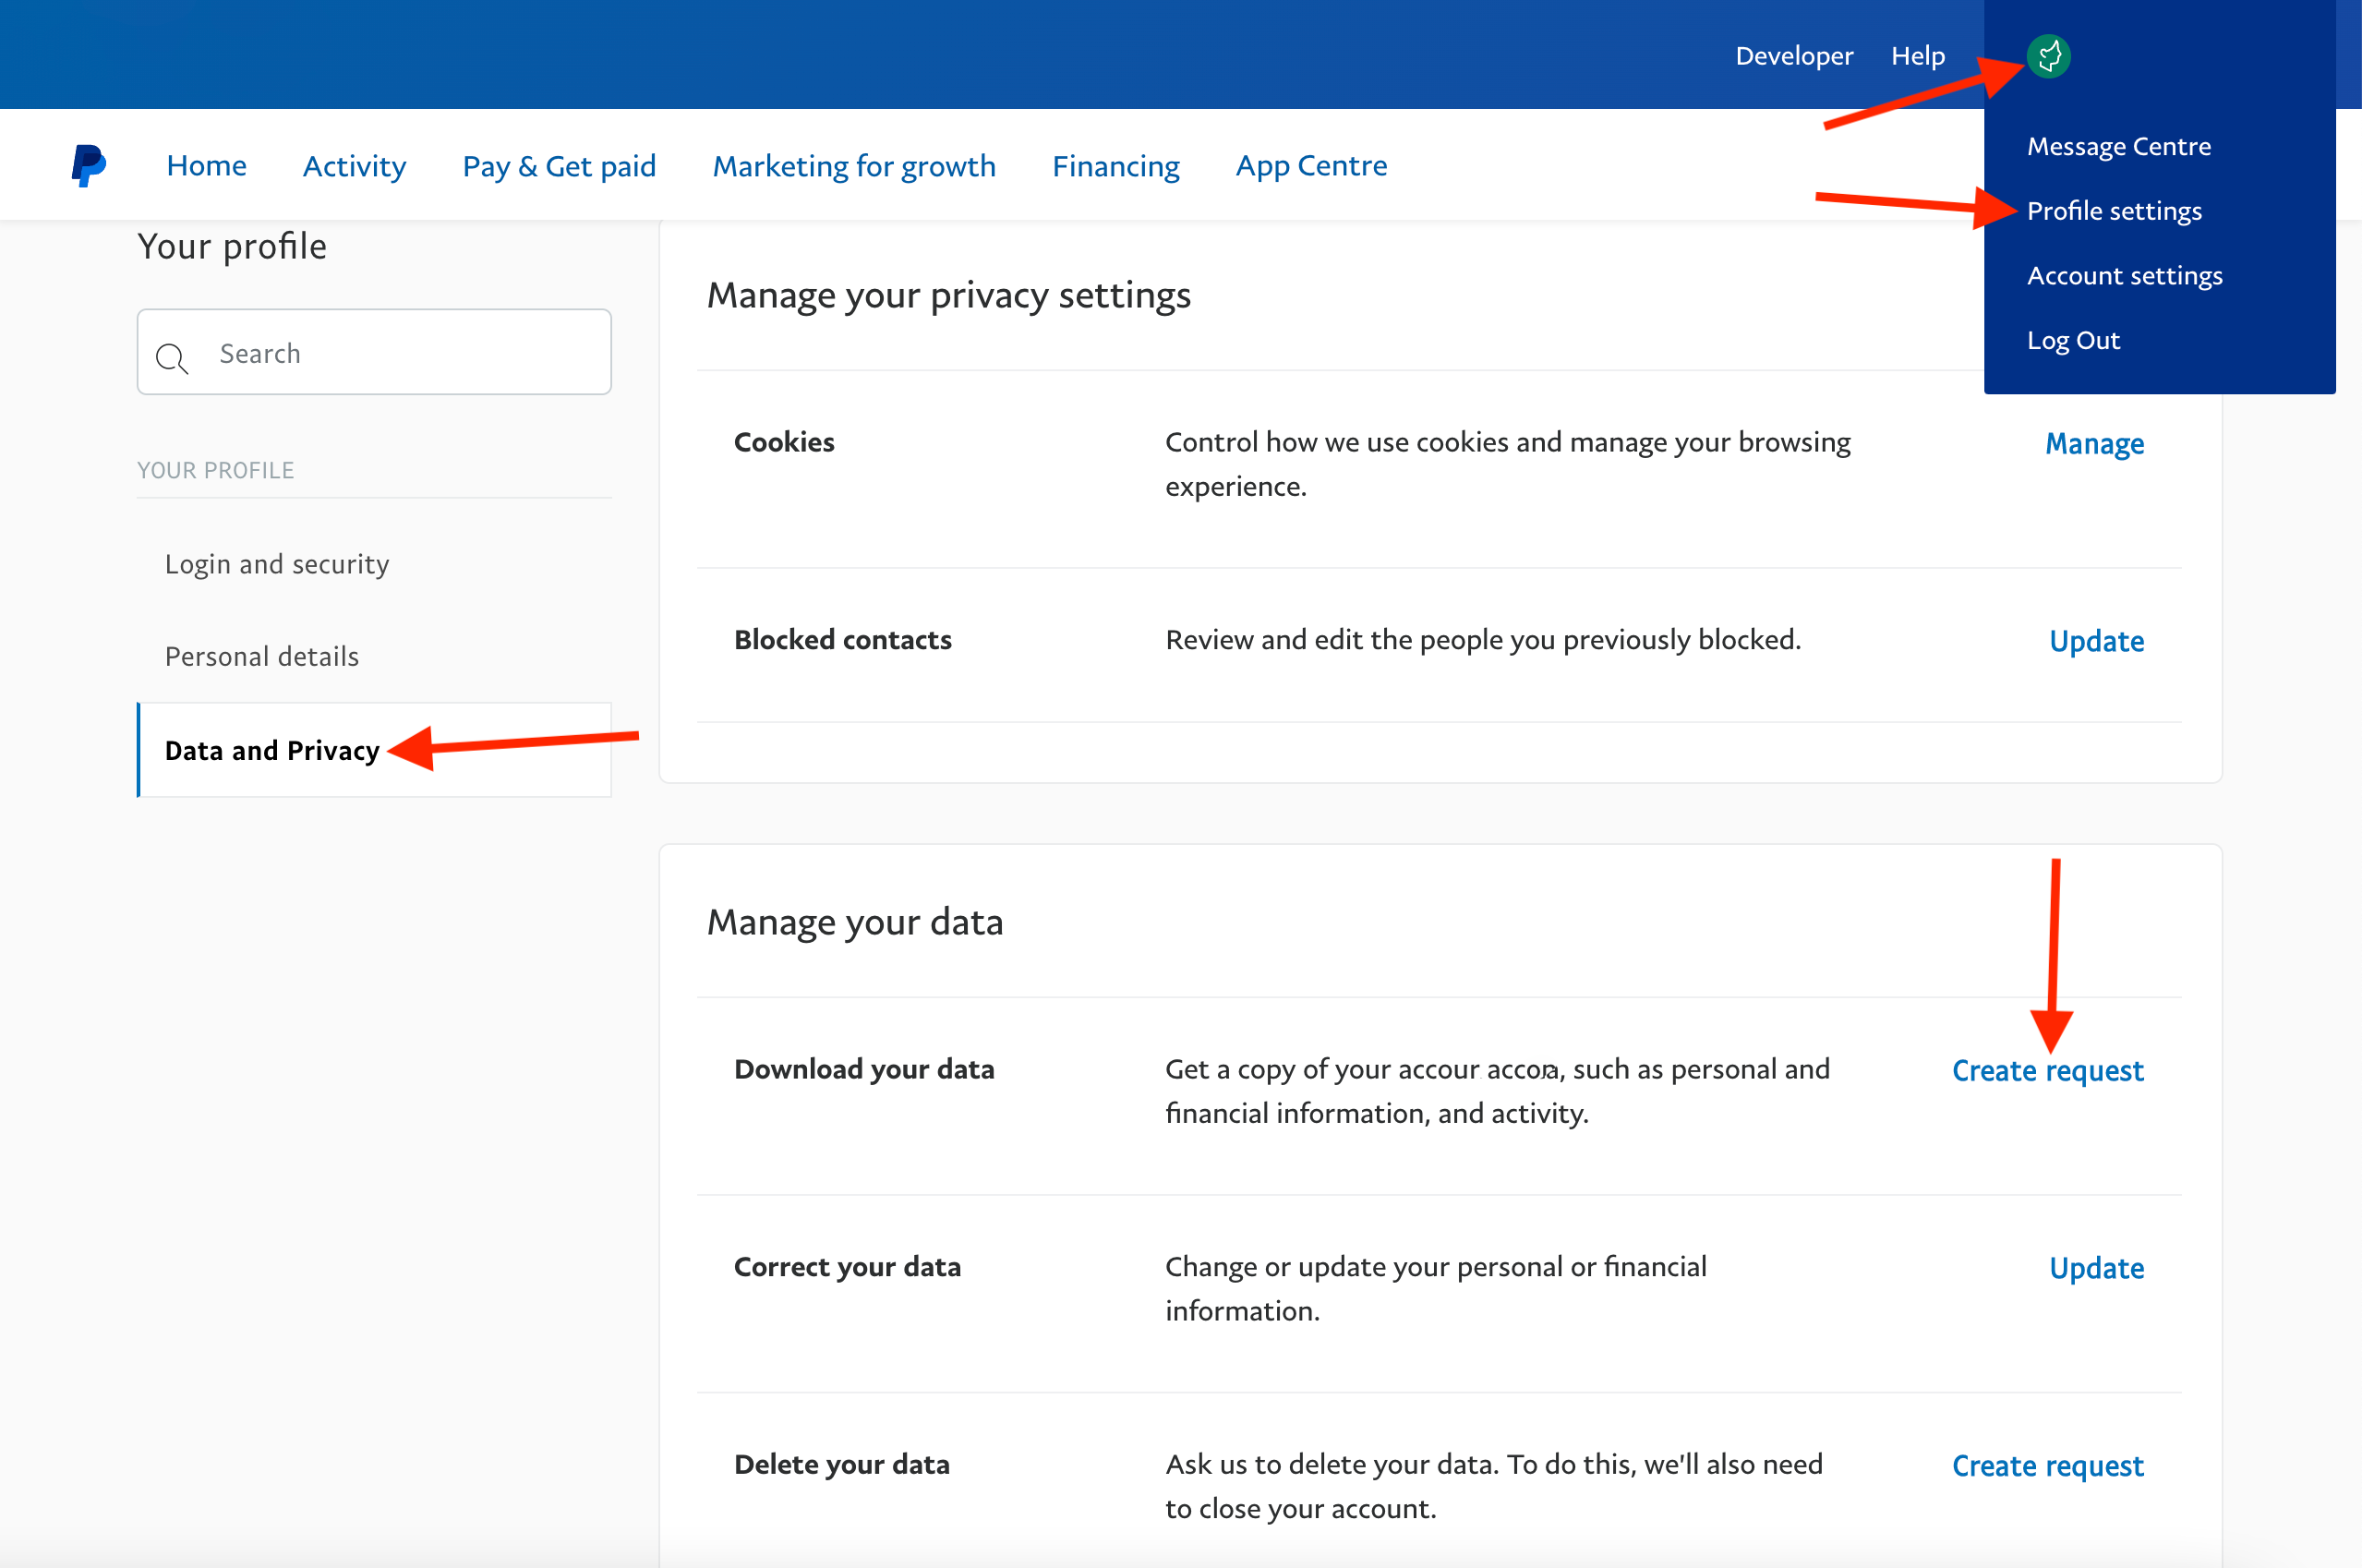
If you want PayPal to erase your data when deleting a PayPal Business account, open your “Profile settings” and select “Data and Privacy” > “Create request” to start the process.
Note that PayPal may ask you to submit identity verification when you request personal data deletion. This page contains more details on PayPal’s verification process and its legal data retention obligations when erasing data.
Deleting your PayPal account without requesting personal data deletion
If you want to close your personal PayPal account without making a request for PayPal to delete your personal data, you can do so on PayPal’s website or in its mobile app.
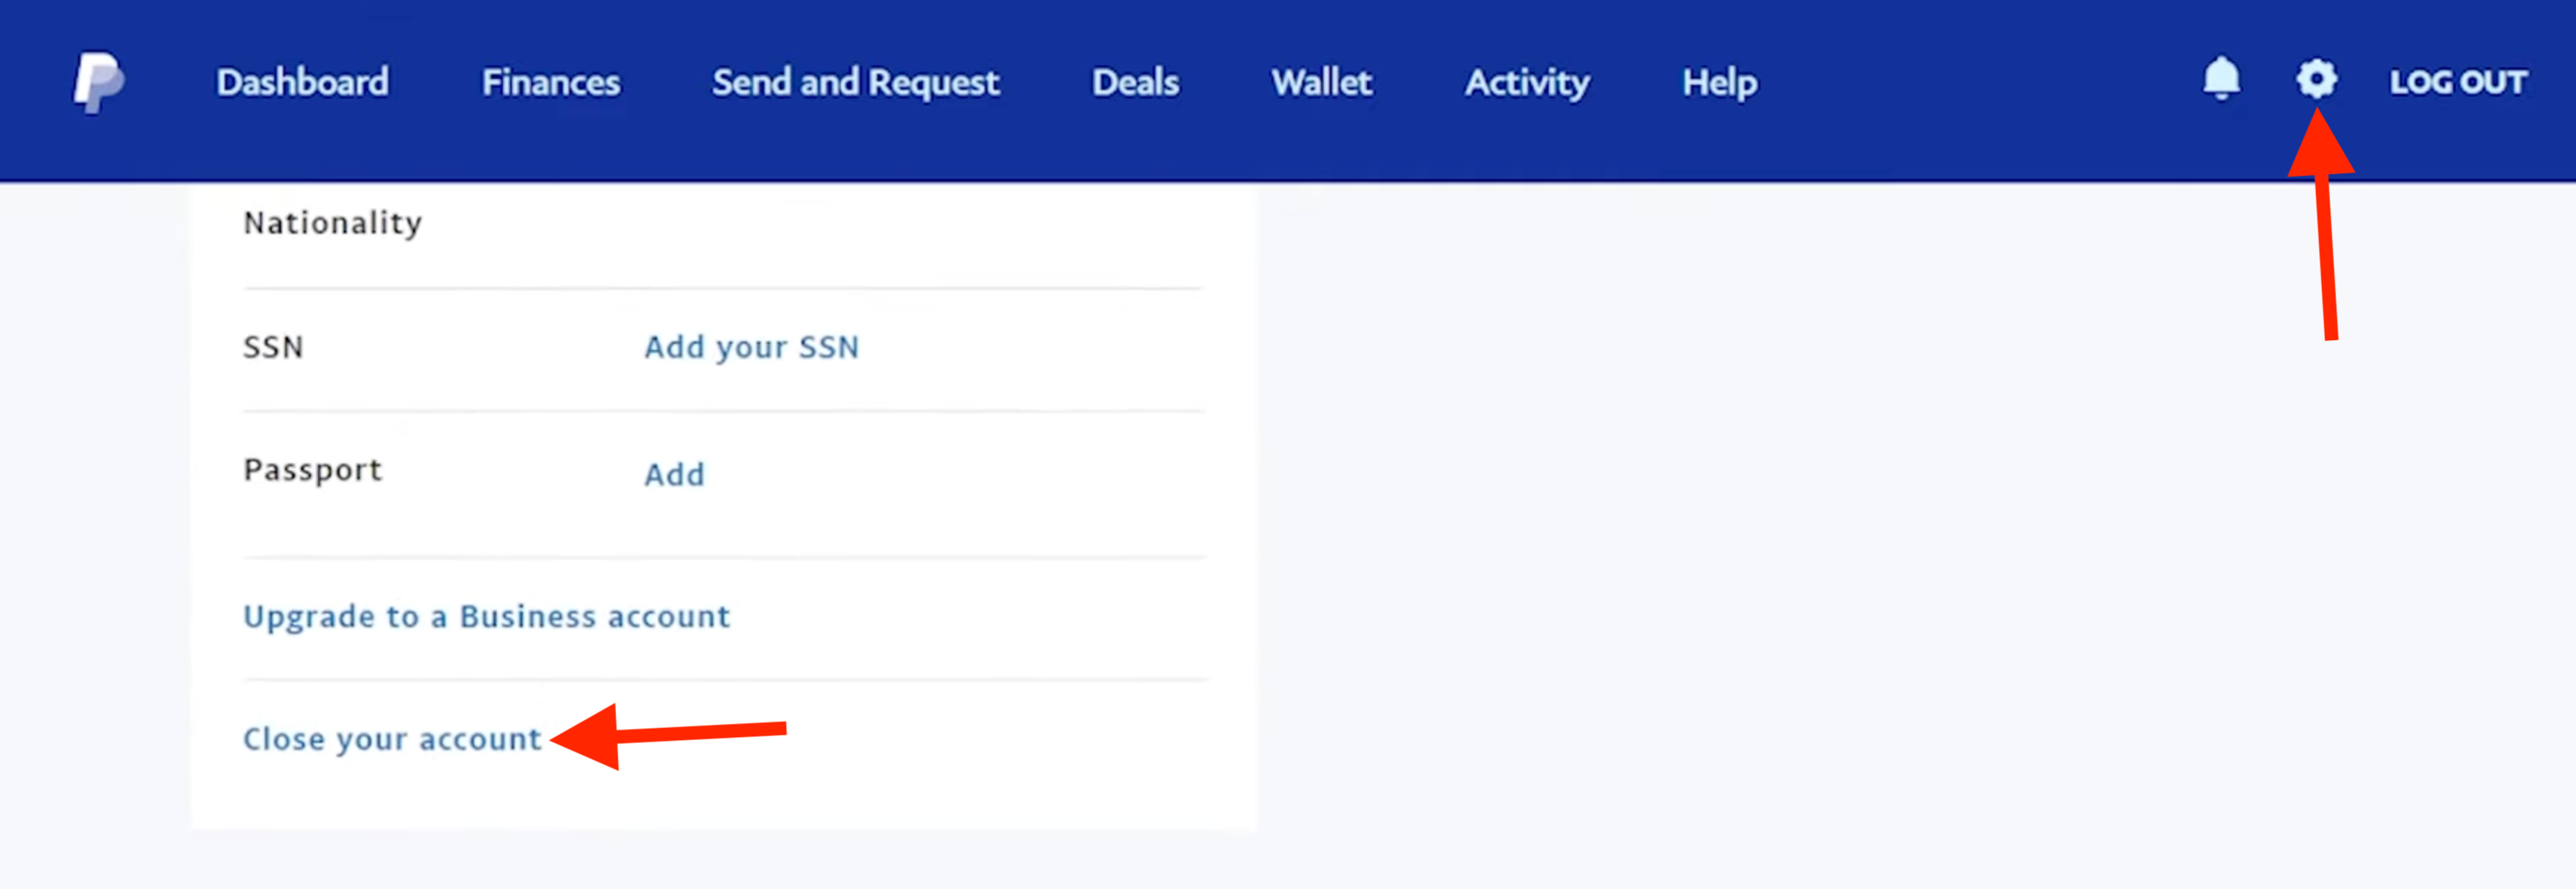
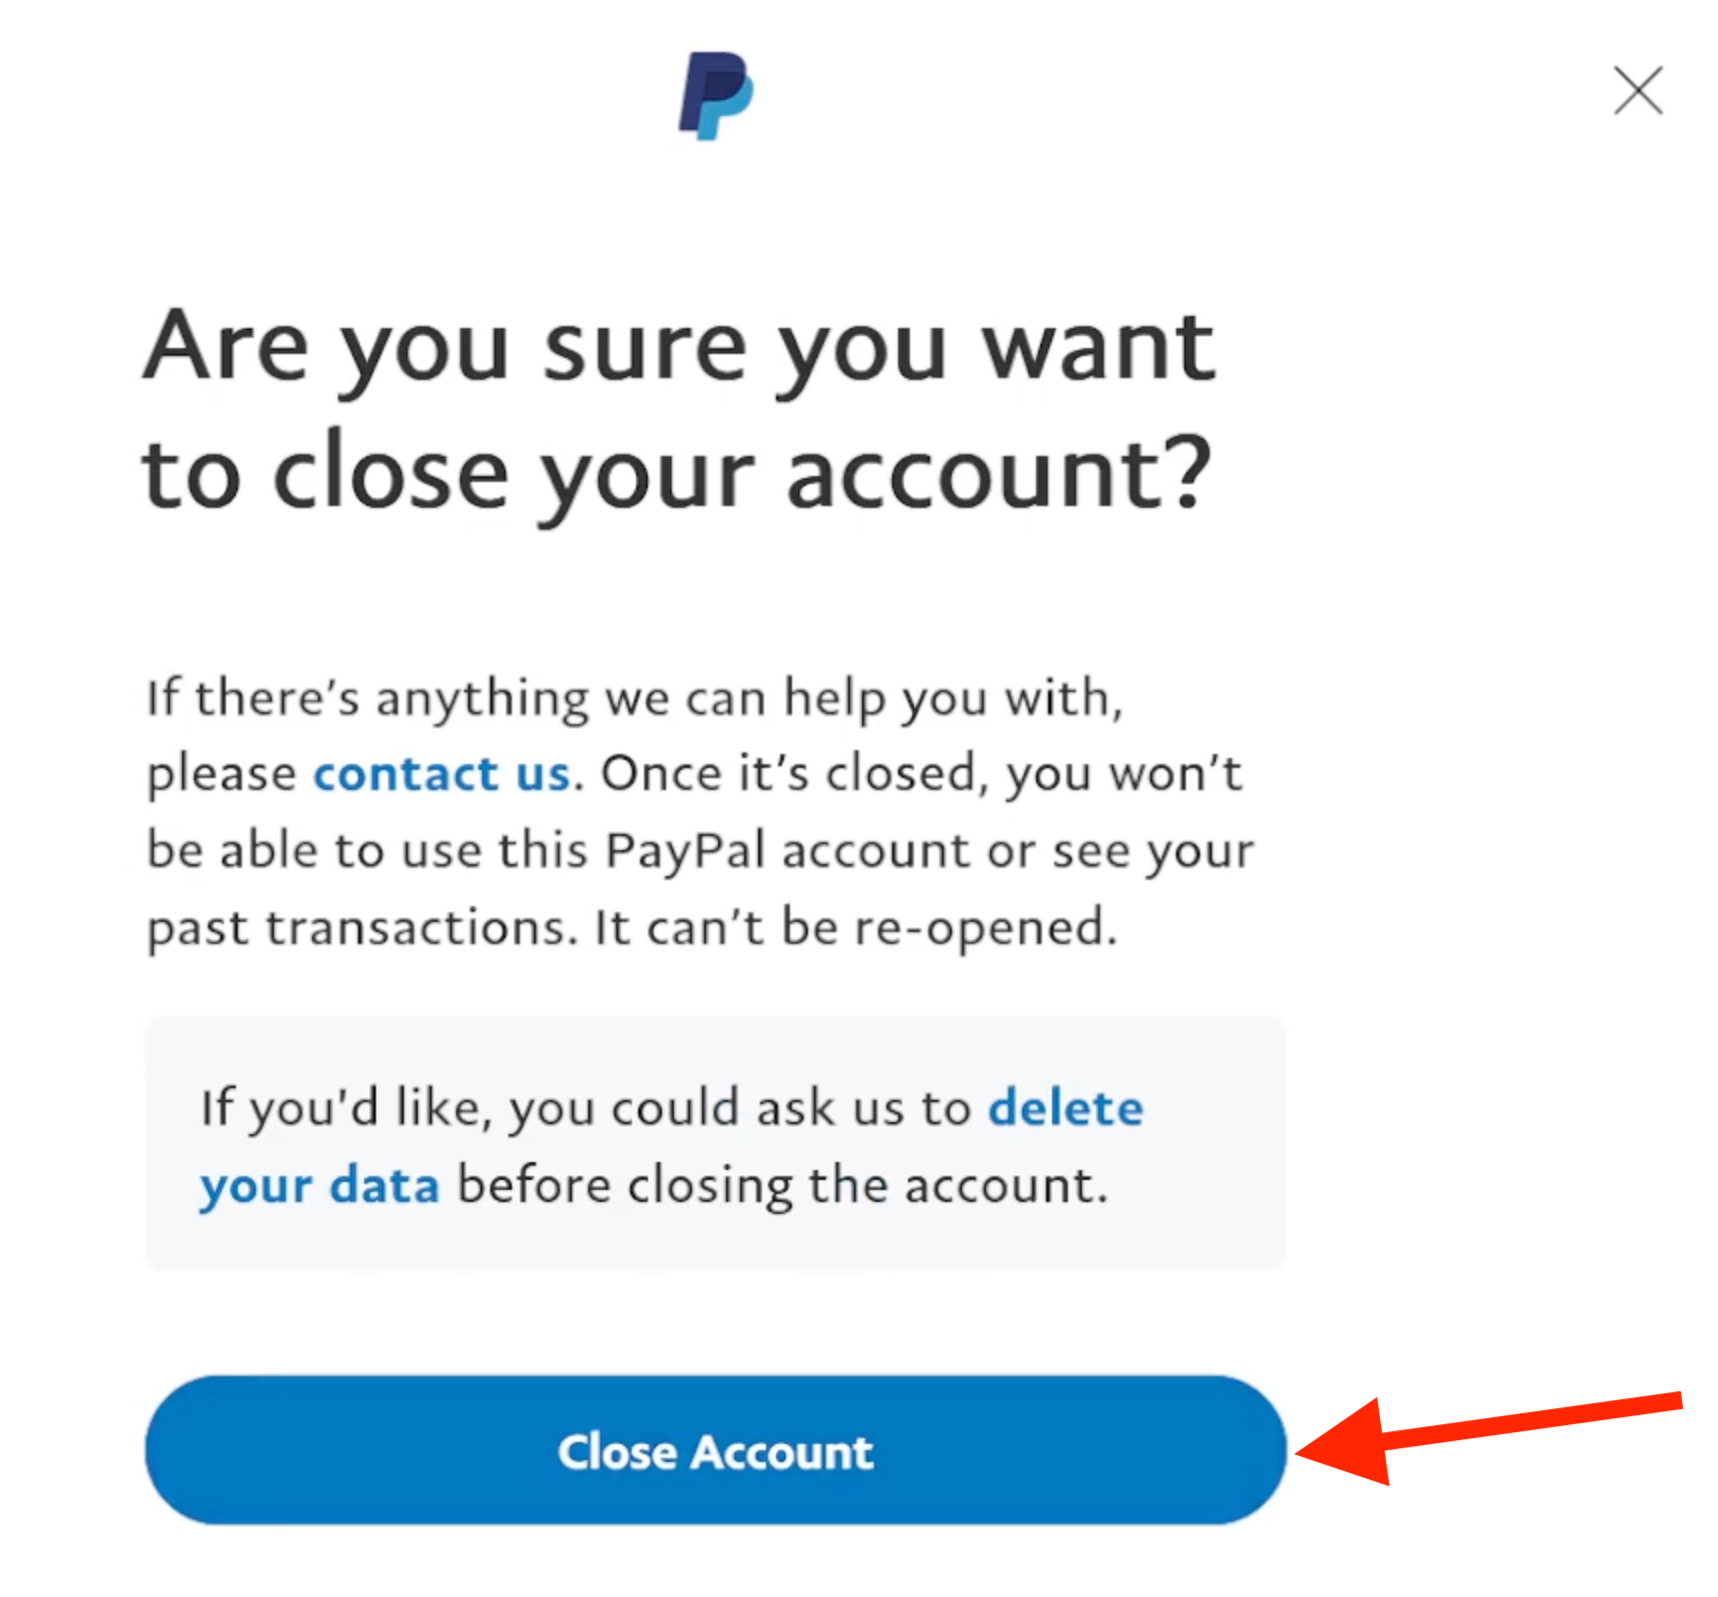
To close your personal account on PayPal’s website, click or tap the settings cog and select “Close your account” > “Close Account.”
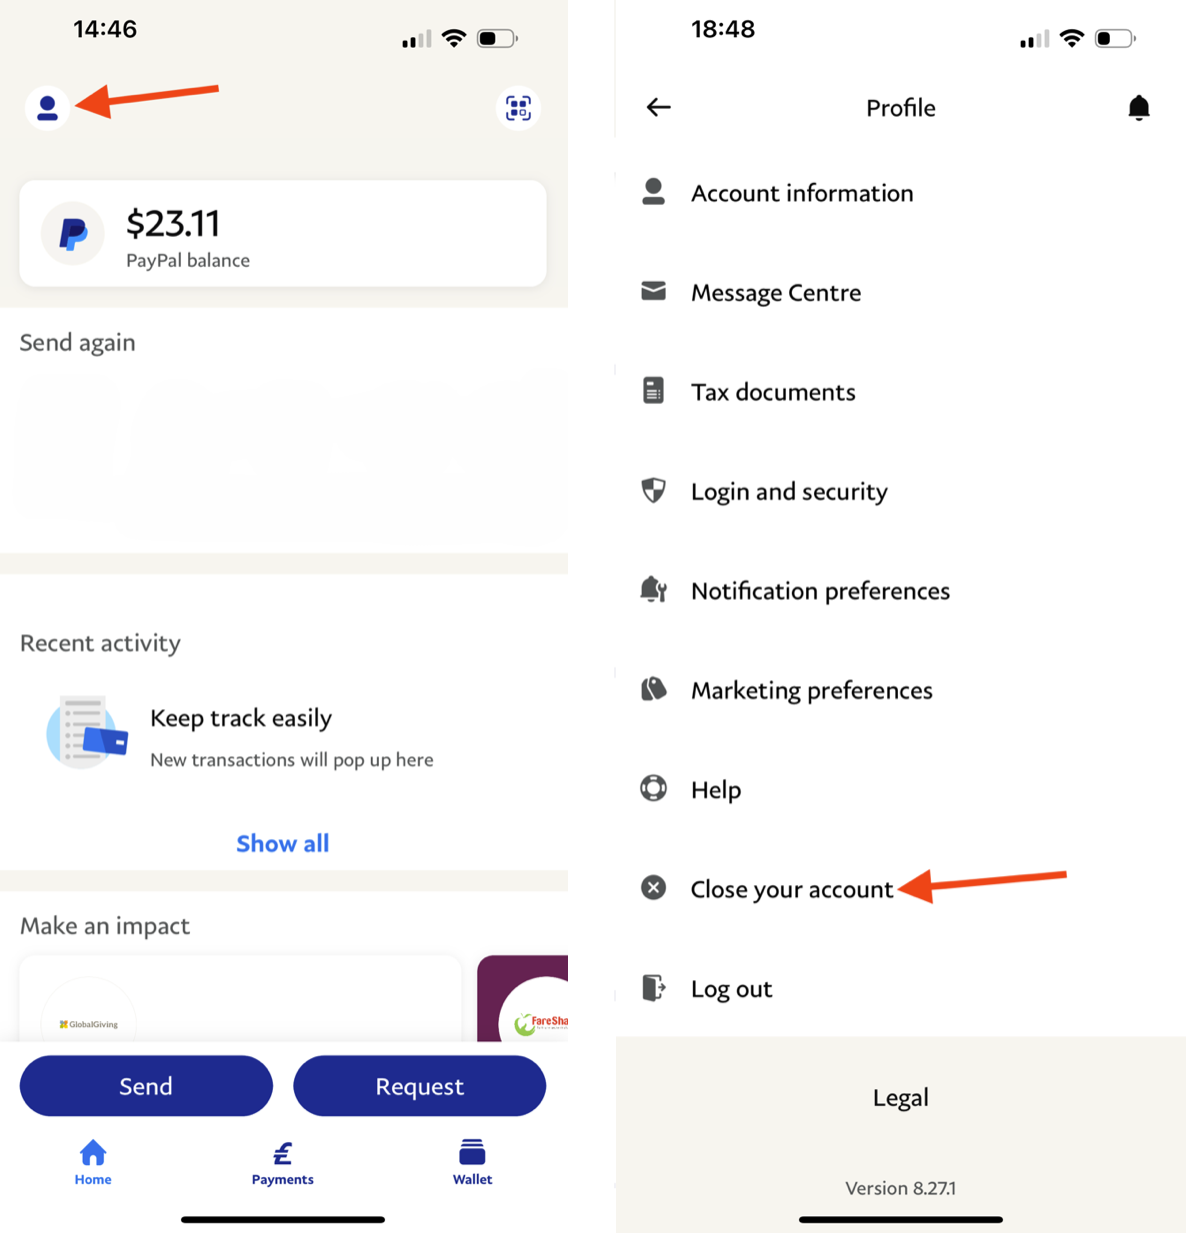
To close your personal account in the PayPal app, tap your profile icon and select “Close your account” > “Close account.”
To close your PayPal Business account on PayPal’s website, open your “Profile settings” and select “Close account.”